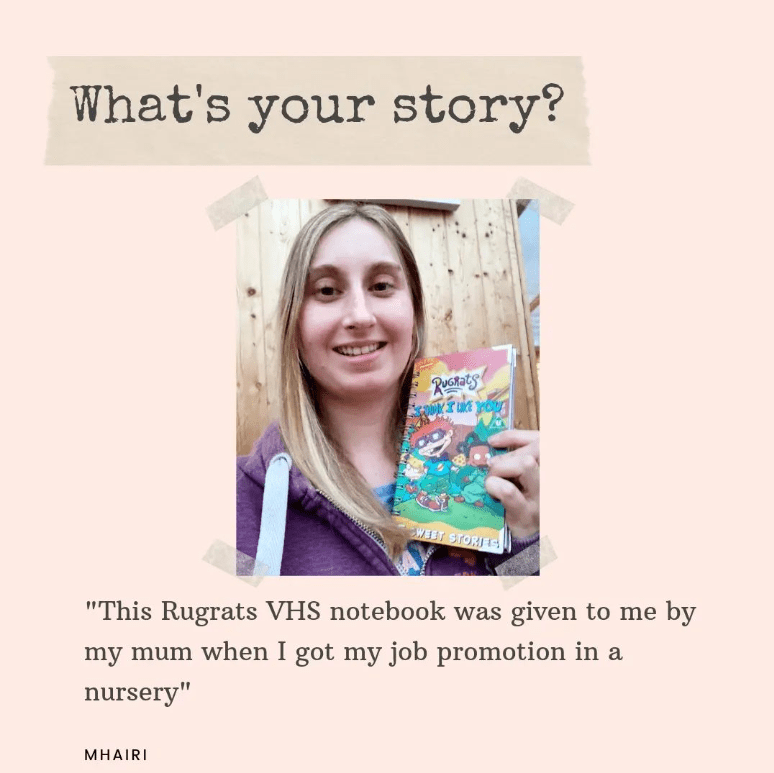
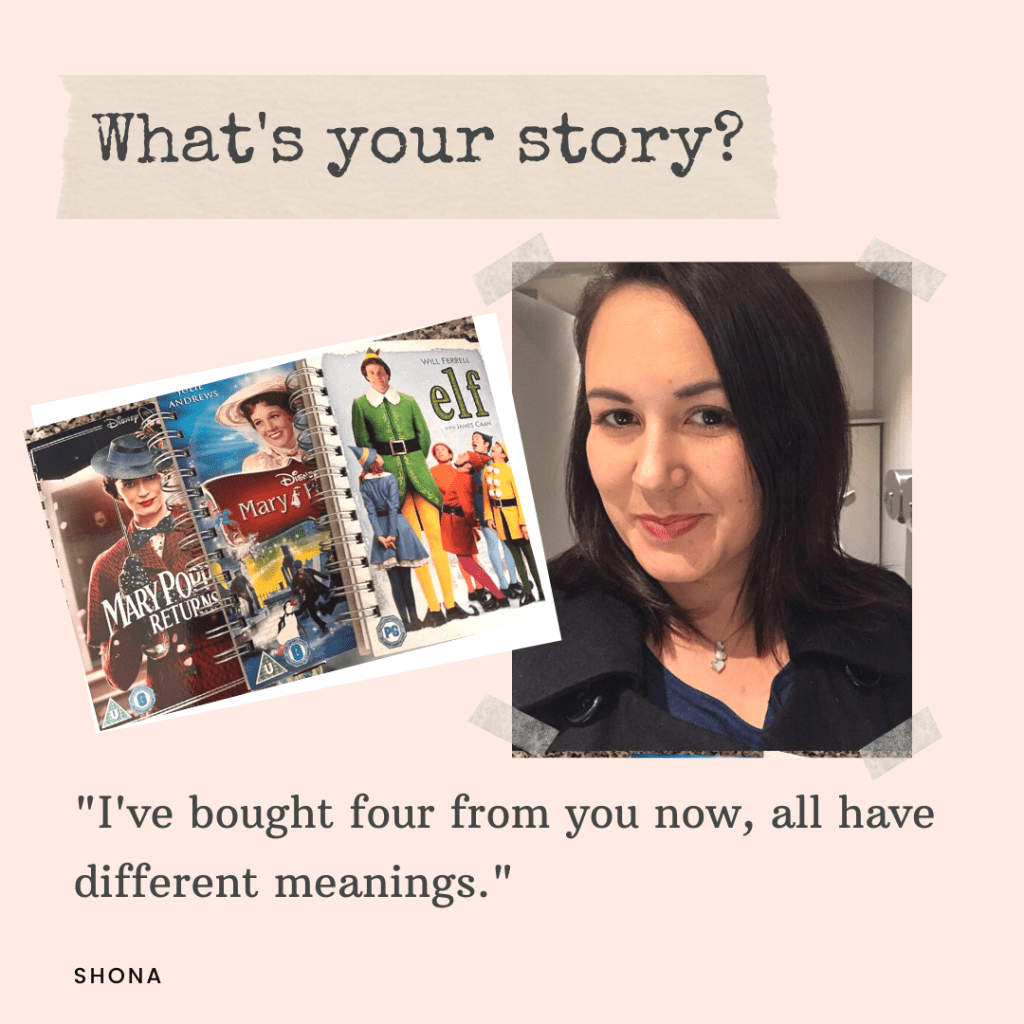
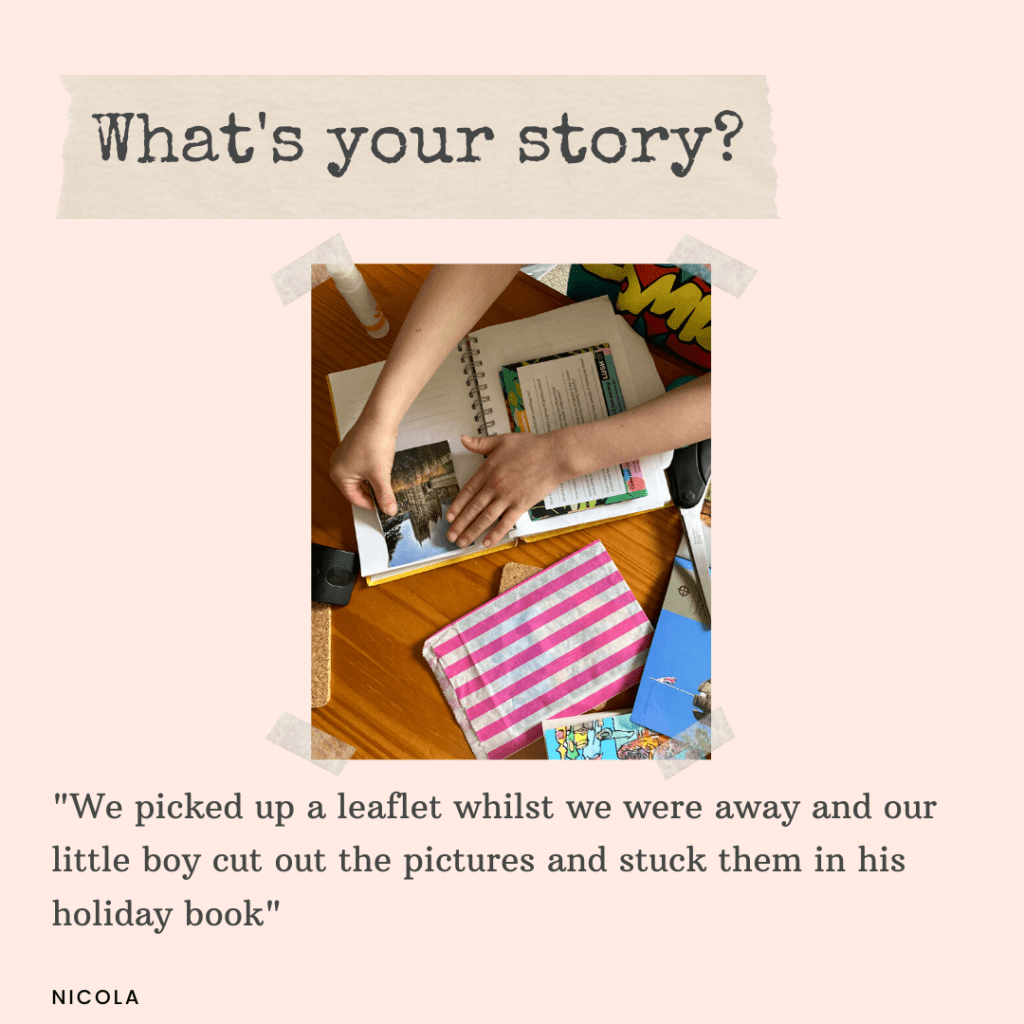
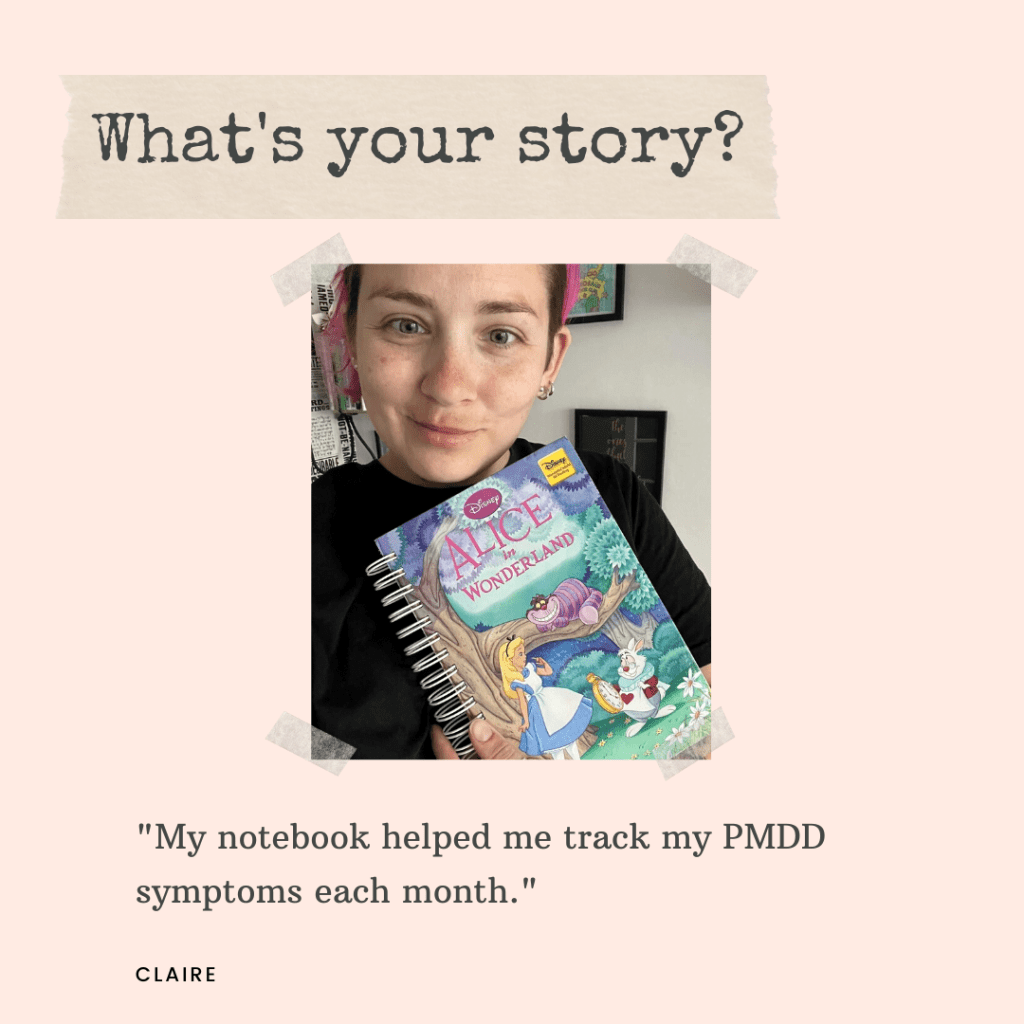
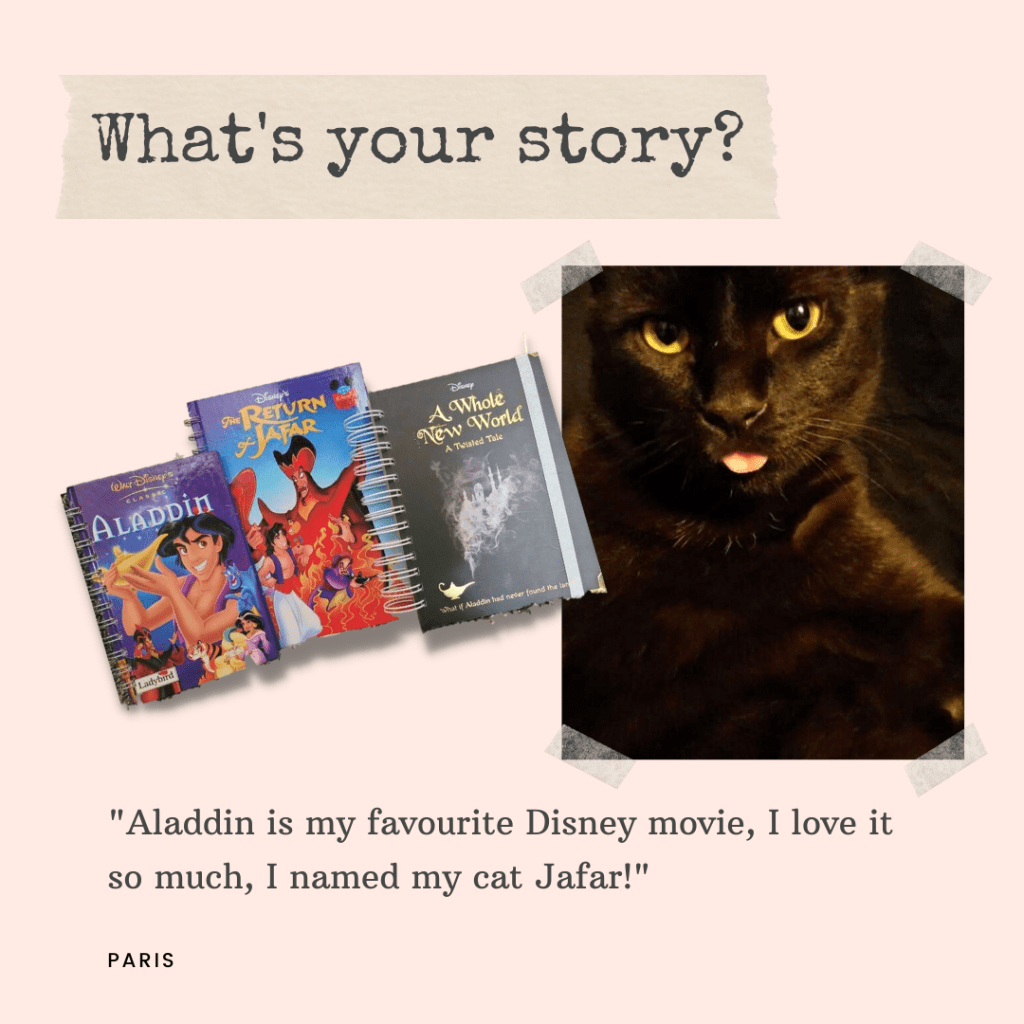
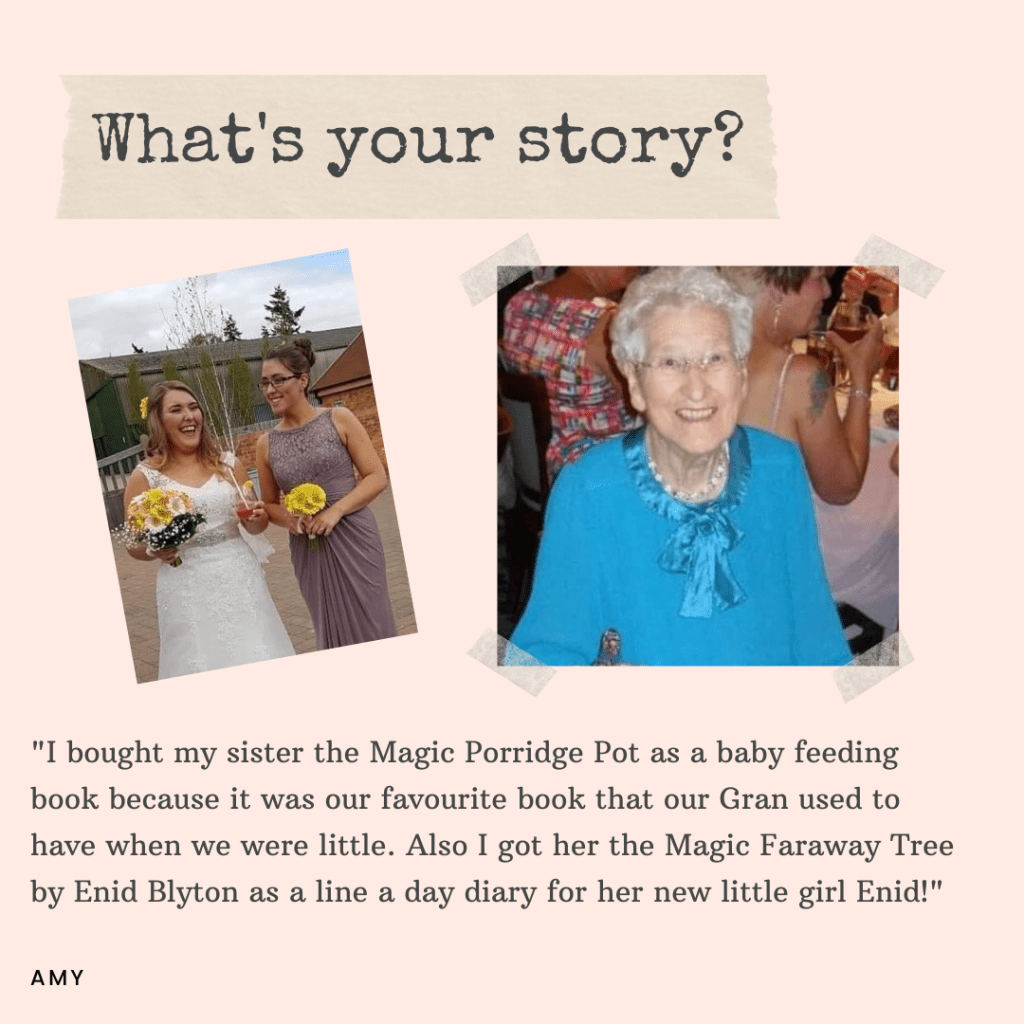
Earlier this year I asked if you would like to share the stories behind your notebooks. I had a great response! Thank you to everyone who got in touch and revealed their story.
I guess it wasn’t really a shock to discover just how much a book or film can mean to you. They are all part of our experiences growing up and have a huge influence and impact on our lives.
But I was surprised at just how varied your reasons behind your notebook purchases were! Perhaps you can resonate with a few of them?
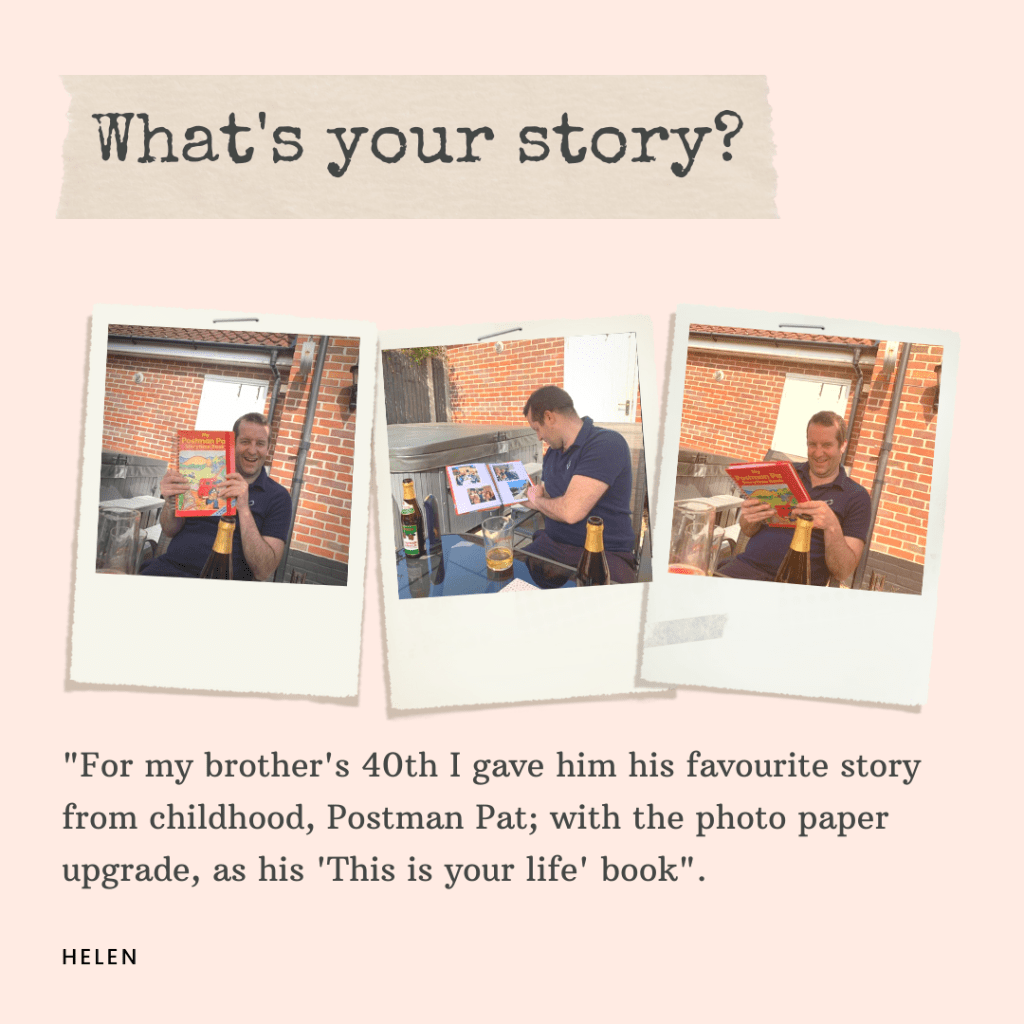
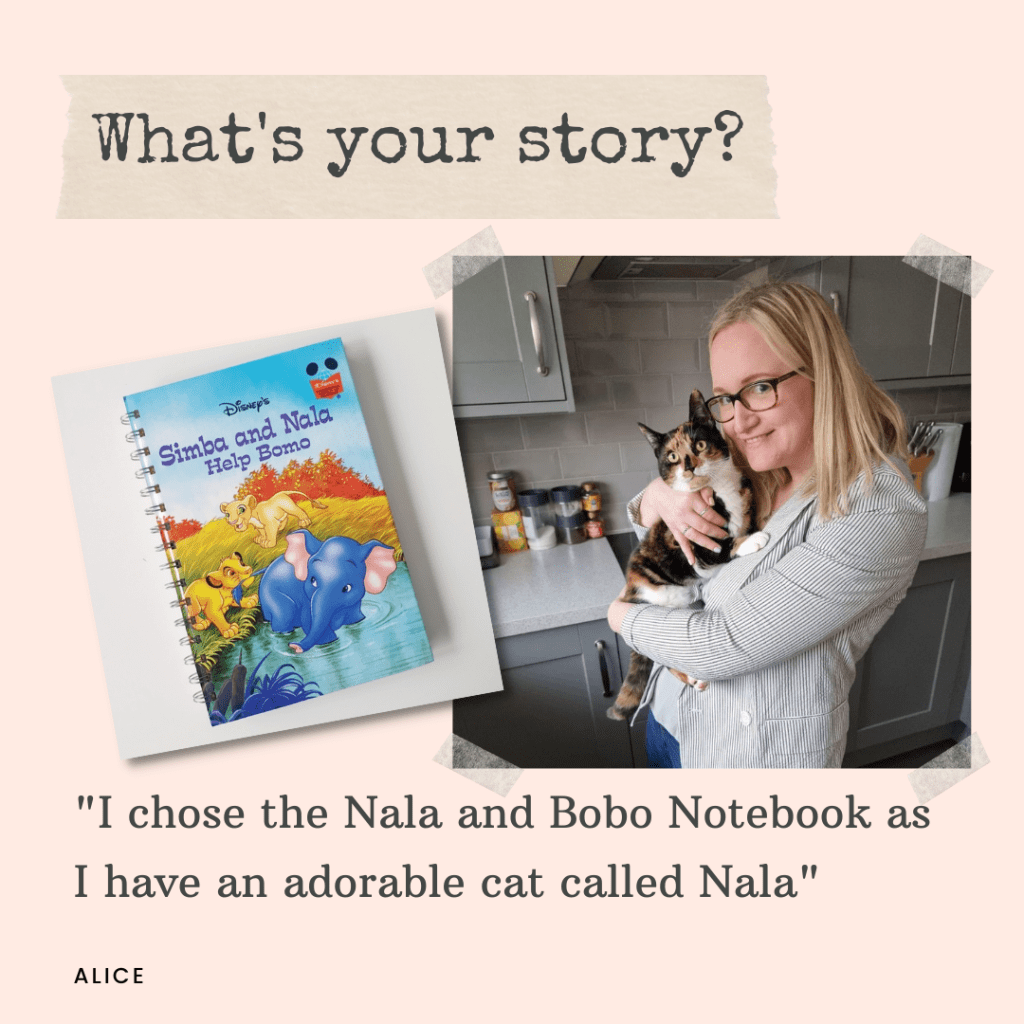
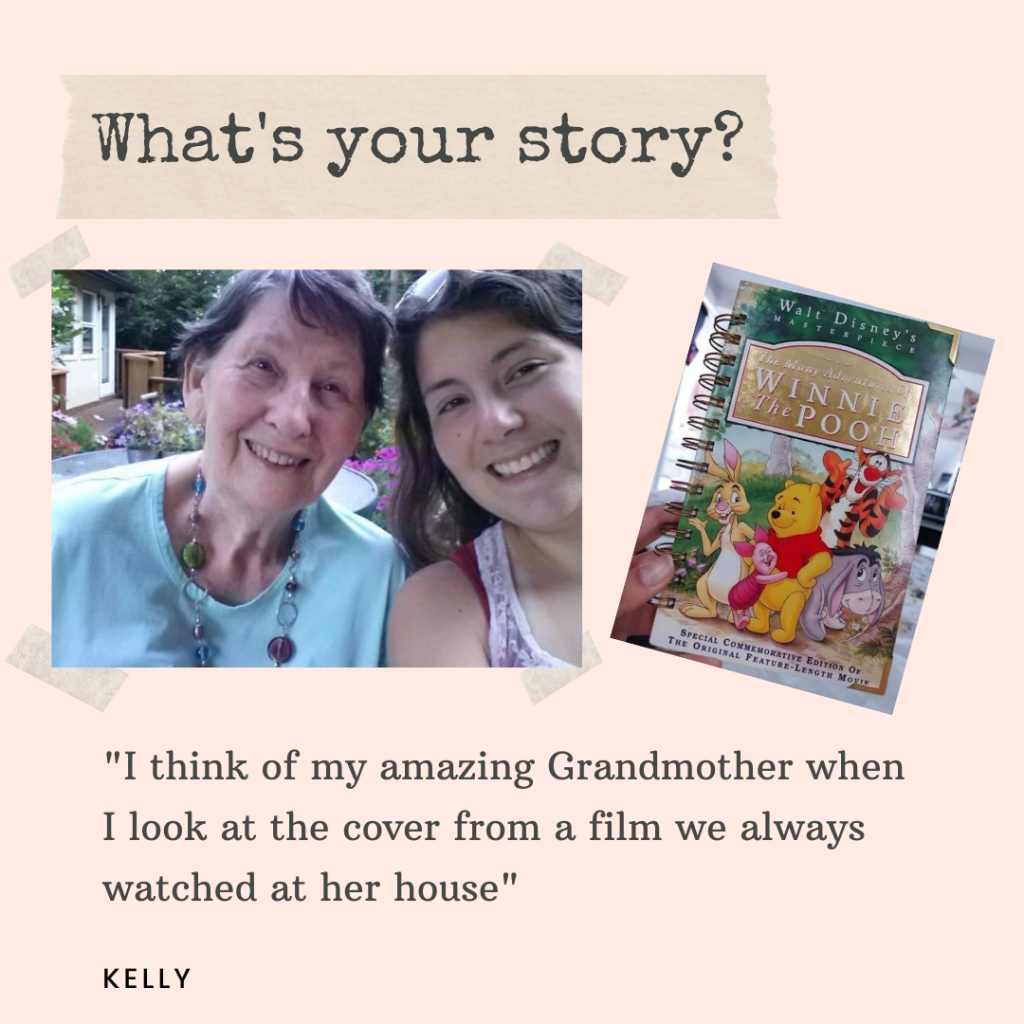
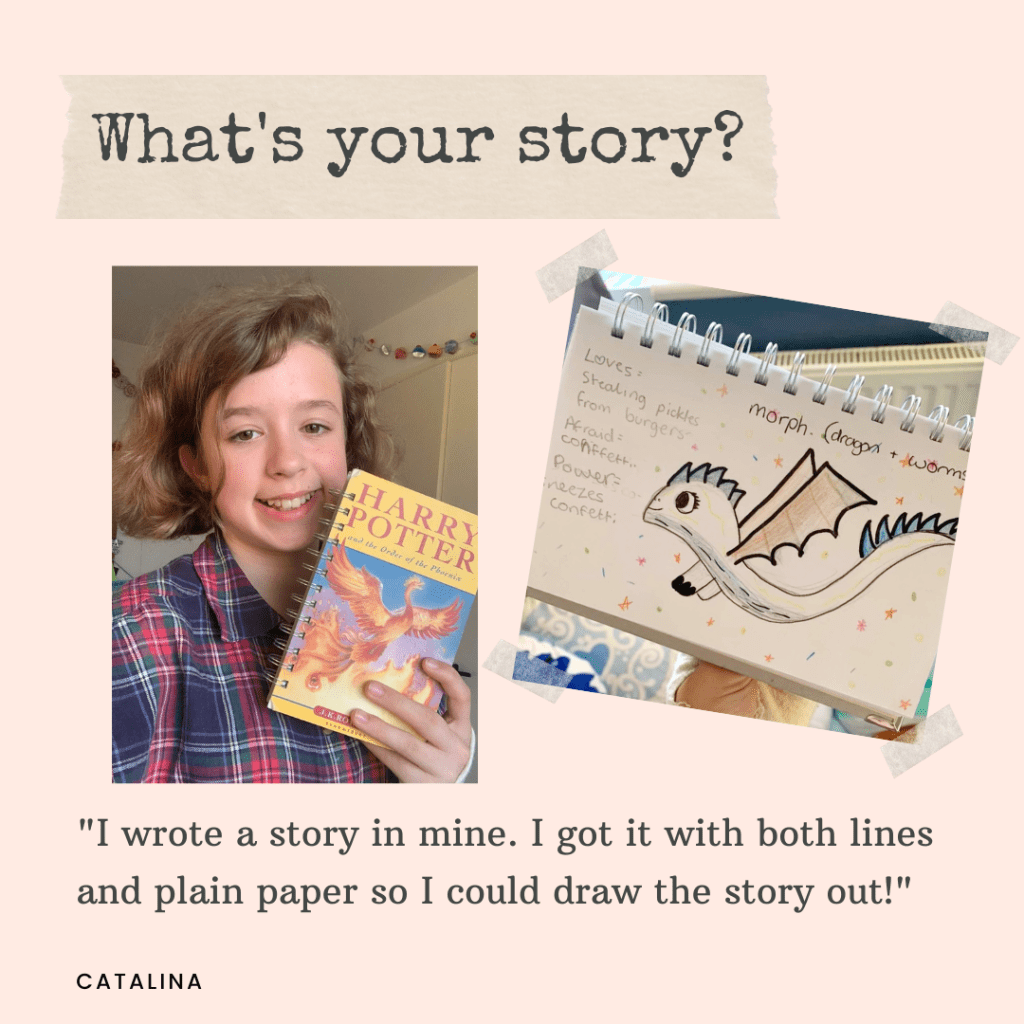
Here are ‘Your Stories’…
Have you got a story to share? Get in touch and let me know, I’d love to hear it.
As the New Year approaches, the choice of diariescan become slightly daunting! Here is my quick guide to help you choose which style of diary page is the perfect one to keep you organised all year round!
If you’ve got a lot to write then this diary is perfect, especially as a ‘Dear Diary’ or a desk diary, because with 365 days in the year this diary is a relatively heavy book and something you probably don’t want to be carrying around every day.
A classic, you can’t go wrong with a week per view. It’s the most popular of all my diaries, ideal for home, work or school but if you have a lot of appointments you might prefer…
Never miss a meeting again with a vertical diary – you can list all your appointments in time order, each day. Perfect! Nice and light to show off carry to meetings.
Designed by one of my customers, Pippa; this is perfect for those that want to carry their work and home life in one book. Every four weeks there is a page of lines for notes, and a four week overview page, before four weeks of weekly pages. That’s a lot of weeks in one sentence – but enough to fill a book for a year!
If you are more of a planner – then this might suit you better. Feel completely in control of your life with this week per view diary but with dedicated space for those important Emails, calls to make, things to buy and things to do…
If you have to organise more than one person in your life then this is for you. With up to six personalised columns, you can separate all the kids activities, the dogs appointments and organise your partner’s life, a week at a time without the worry of double booking yourself.
Remember all my diaries come un-dated so they can be started any time of the year! They make great gifts and with so many different book covers to choose from my shop, there is something for everyone.
I hope this has helped making your diary choice a little easier, ready for the new decade!
Who knew removing old stickers would be so much fun?!
If you’ve been following my Instagram stories then you’ll have seen some of the struggles I have had with stickers. Sometimes it can be REALLY frustrating, but other times it is immensely satisfying, and I know some of you enjoy it too – because you’ve told me!
So before I go straight into it, you do have to be careful these days on the internet, last thing I want is someone trying to sue me! So please let me make it clear that ALL suggestions I make here are from my own experience. That doesn’t mean they will necessarily work for you. (Although I hope they do.)
You should ALWAYS read the label of any products before you use them and make sure if it is safe to do so. (Allergies, well aired room etc…) and wear any protection necessary. (Gloves if you have sensitive skin perhaps)
I am not liable for any damages! If you try one of my tips and it goes horribly wrong, I am not accepting the blame.
Right, sorry about that… lets get started…
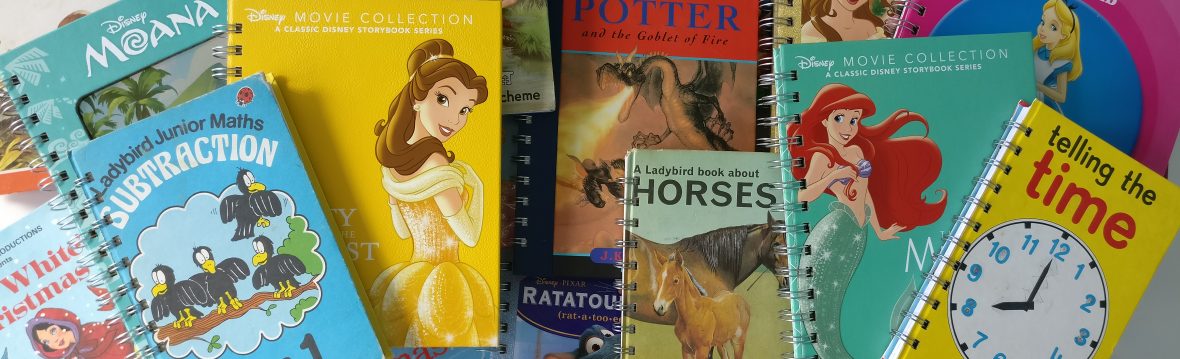
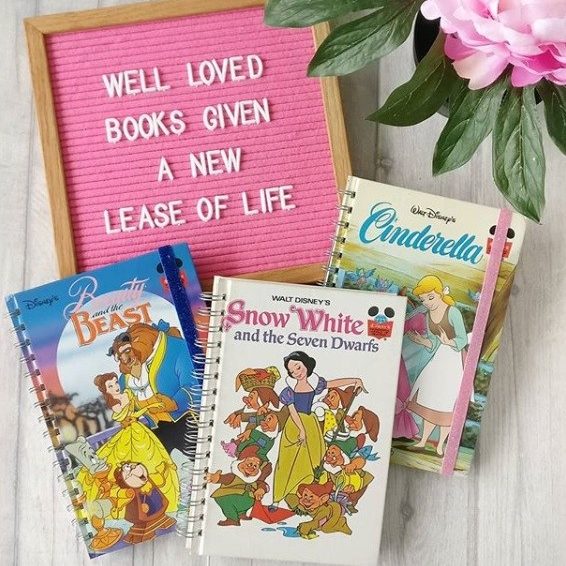
So, these are my methods for taking stickers off of books. Because that’s what I do… I buy second-hand books and spruce them up and turn them into notebooks. They are mostly purchased from charity shops who like to use a variety of stickers. Some favourable. And some not…
So there’s two main things to worry about – the sticker and the surface it is on.
Stickers will react differently to different surfaces. For example, a sticker on a matt covered book will normally adhere more strongly than the same sticker on a laminated book.
The glue on stickers varies, some are lovely peely ones and others are just pure evil! And the problem is you won’t know what you’ve got until you have a pick!
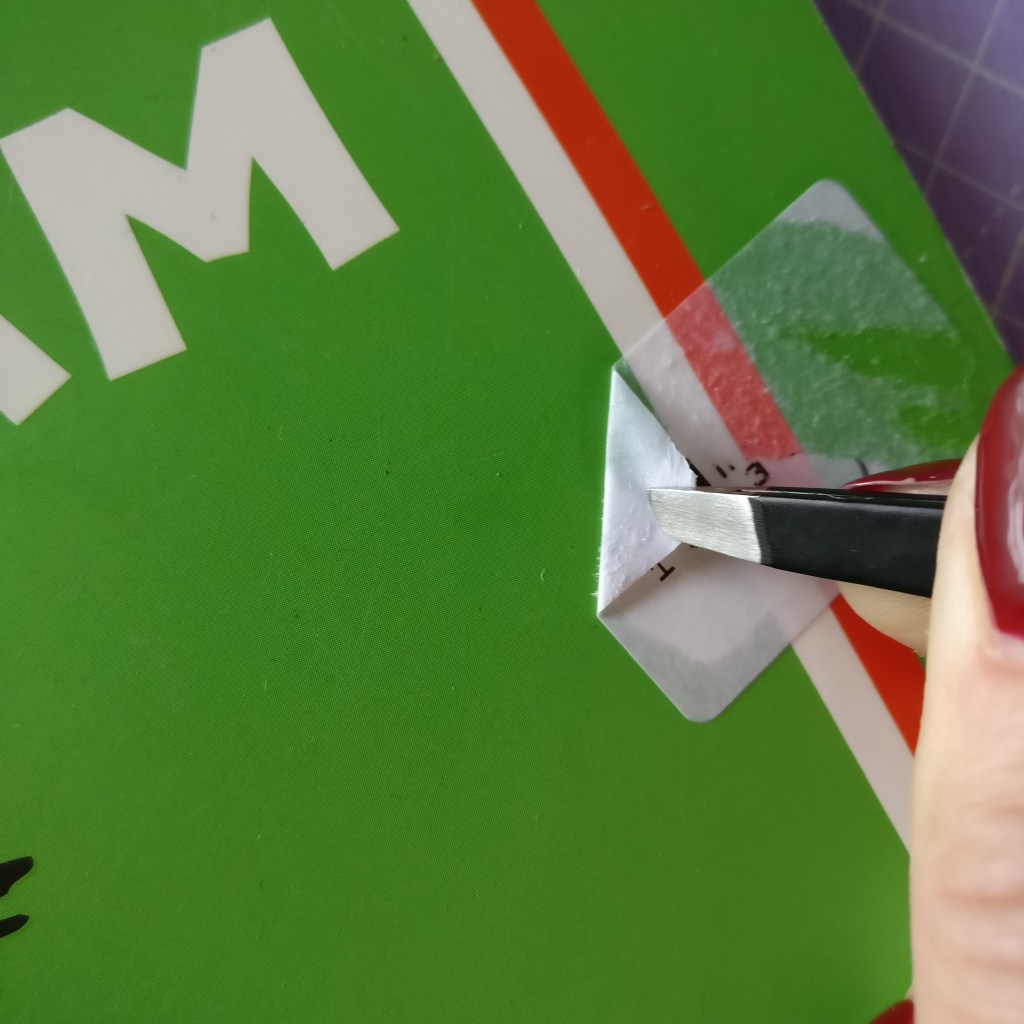
So first of all start from a corner that looks good to lift. You can use your finger nail for this. Once I’ve got the sticker started, I use a pair of tweezers to finish the peel.
If the corner lifts with relative ease, its probably going to come off fine, all in one go. Pure joy! HOWEVER, be aware that when you are peeling even the easiest of stickers, you can still damage the book. It’s all in the lifting action! You need to pull the sticker as close to the surface of the book as possible, to prevent the book laminate from lifting away from the book.
If you pull upwards you risk pulling the laminate away from the book and stretching it, leaving what looks a bit like an air bubble. And once you’ve stretched it, there’s no going back. (You could try a hairdryer on it but it’s not likely to improve. Prevention is best.)
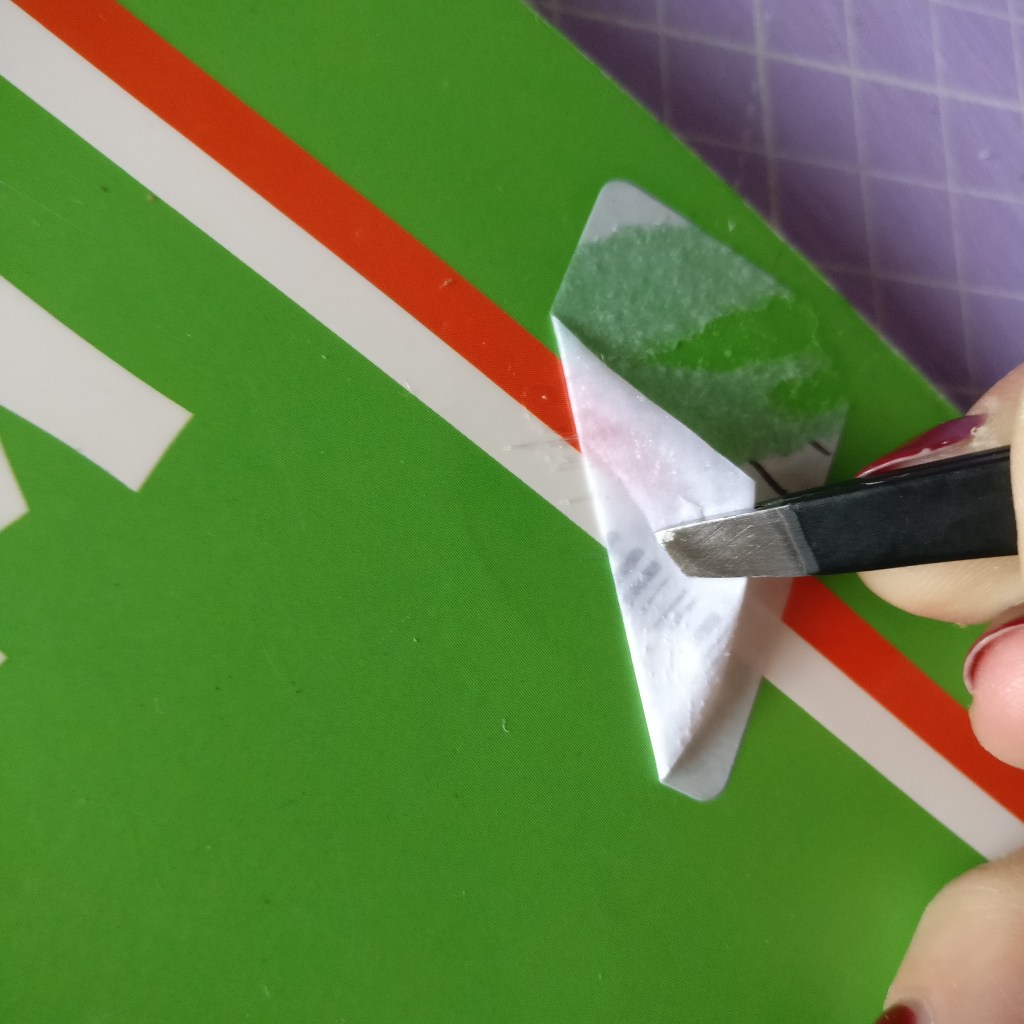
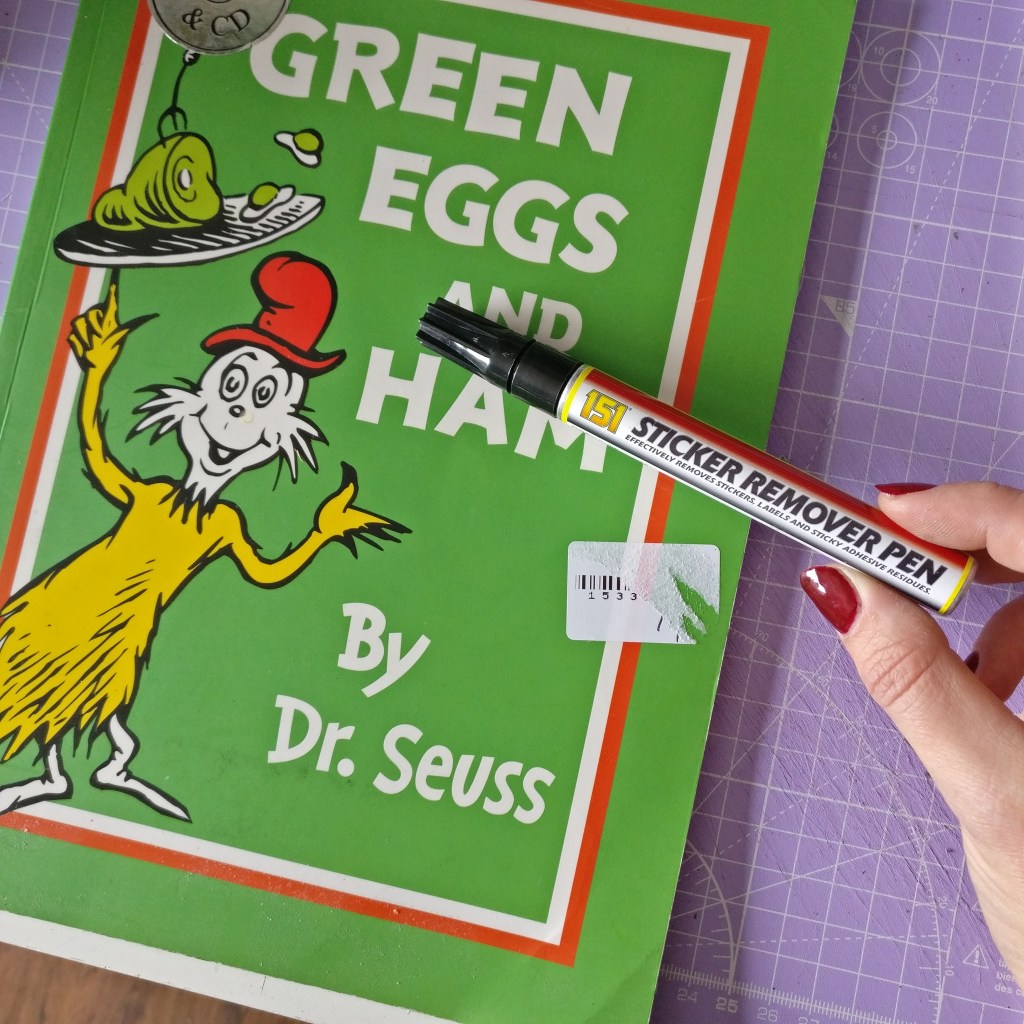
If I find the sticker isn’t budging, or I get a bit of sticker off and then it just tears, I stop picking and use my Sticker Remover pen by 151. I got mine in my local pound shop but you can get them on ebay easily too.
Give the pen a good shake. And then gently dab the sticker pen ALL OVER the sticker paying particular attention to the edges. Now, if you have a matt sticker, I can pretty much guarantee that the sticker remover pen is going to work perfectly. Let it soak in for about a minute. Then peel. Remember, do not lift! Peel as close to the surface as you can. The sticker should come off easily with little to no glue residue left.
But what if it is a sticker with a shiny surface? That’s a little harder. Sometimes the pen will absorb in. And sometimes it won’t. You can try to remove just the shiny layer of the sticker and then use the pen; that sometimes works.
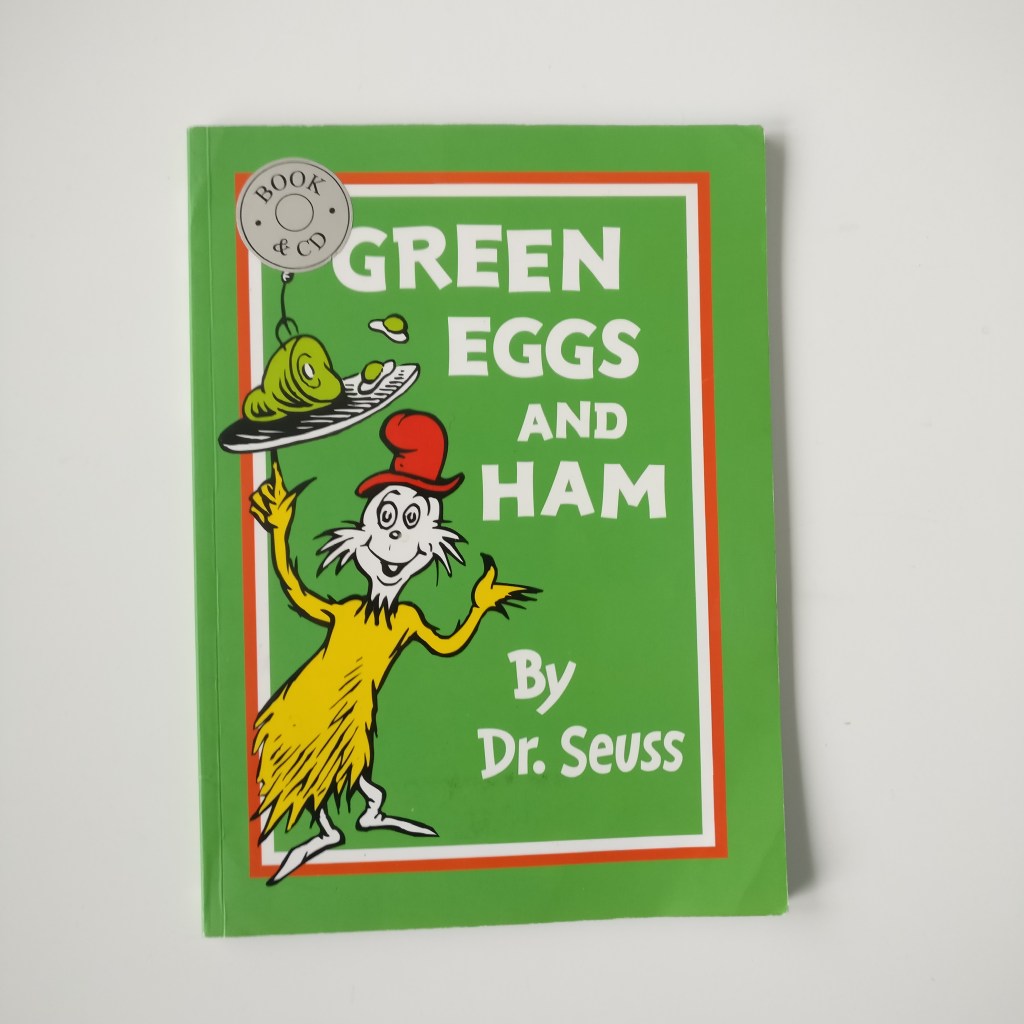
I have EVEN used the sticker remover pen on matt ladybird book covers and it has worked, I was worried it would leave a stain on the paper cover, but if it did, it was minimal.
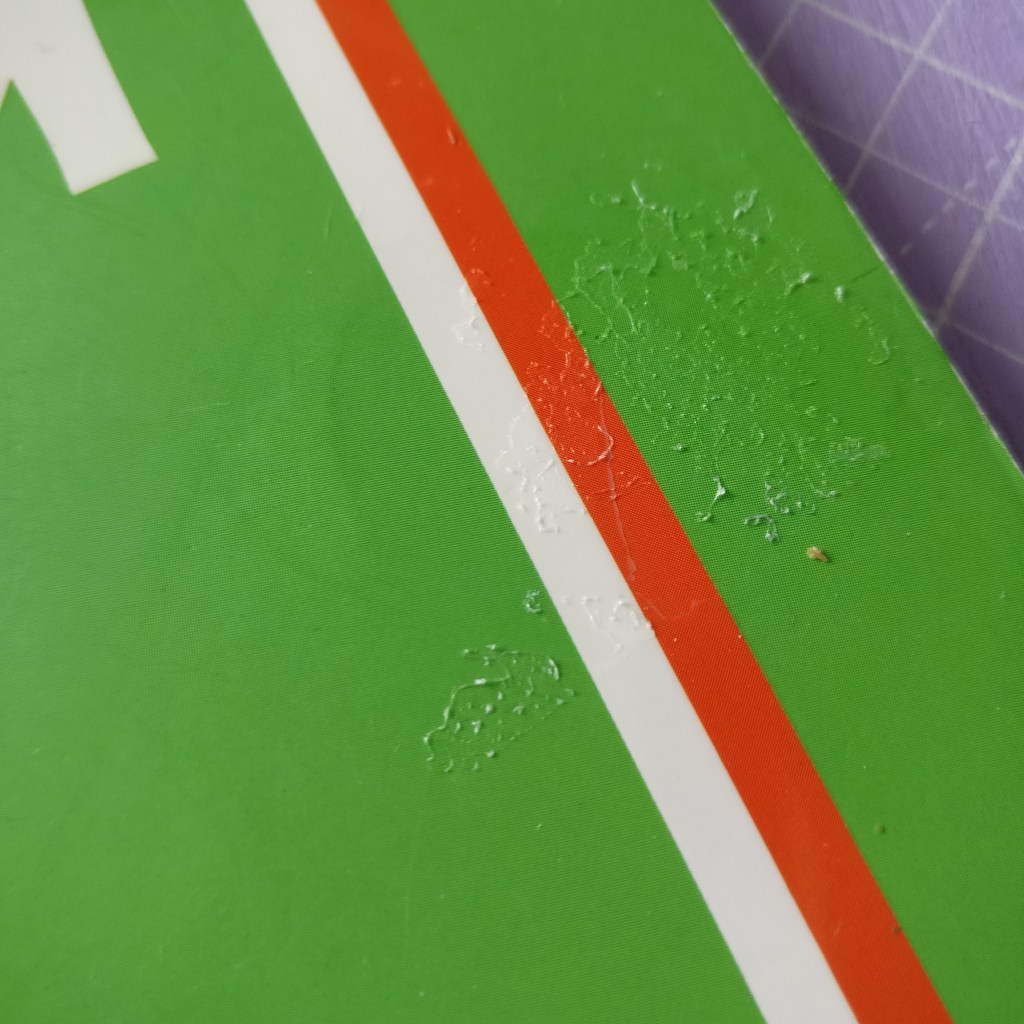
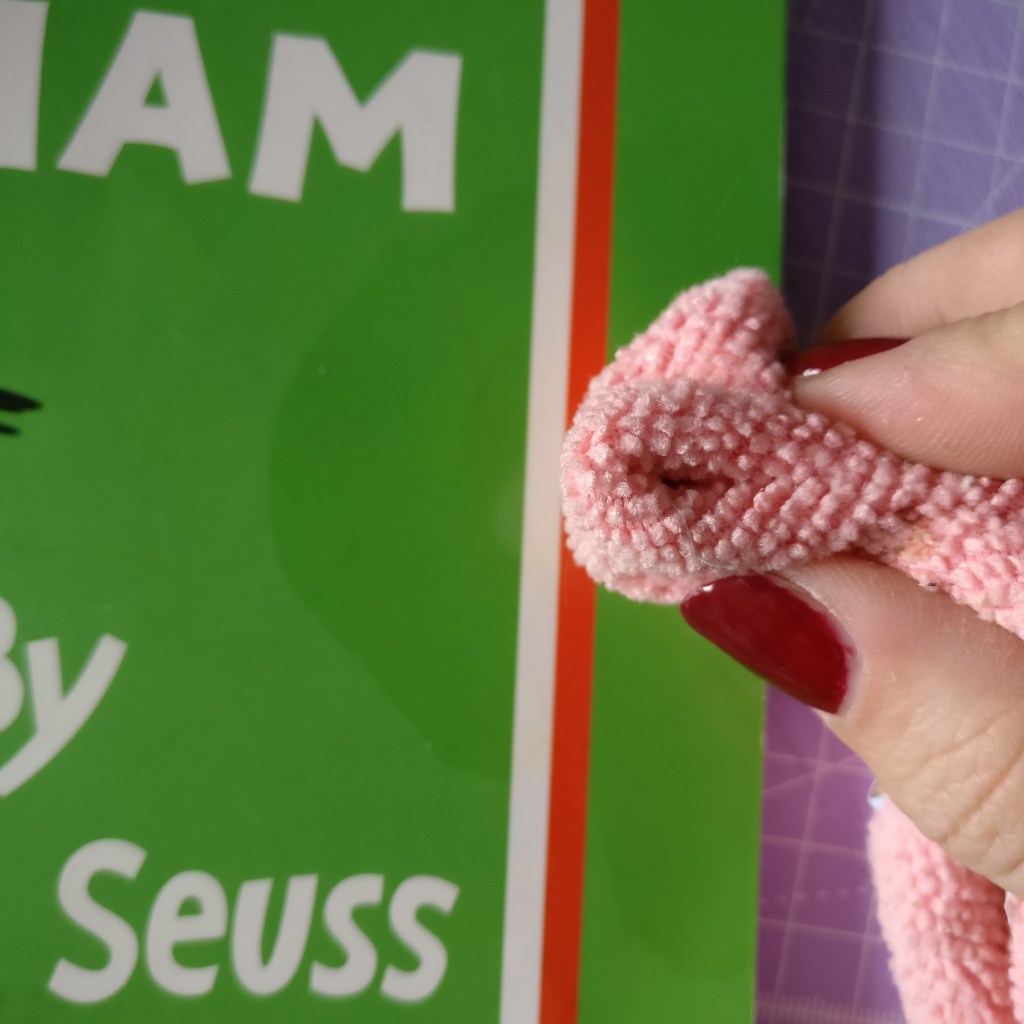
If your sticker isn’t budging then you may have no choice but to slowly pick away as much of the sticker as you possibly can. You will then find that you have some sticker residue left on your book. Do NOT be tempted to wipe it just yet! Believe me there is nothing worse than spreading glue residue everywhere!
The left over sticky residue – do not be tempted to wipe it – yet!
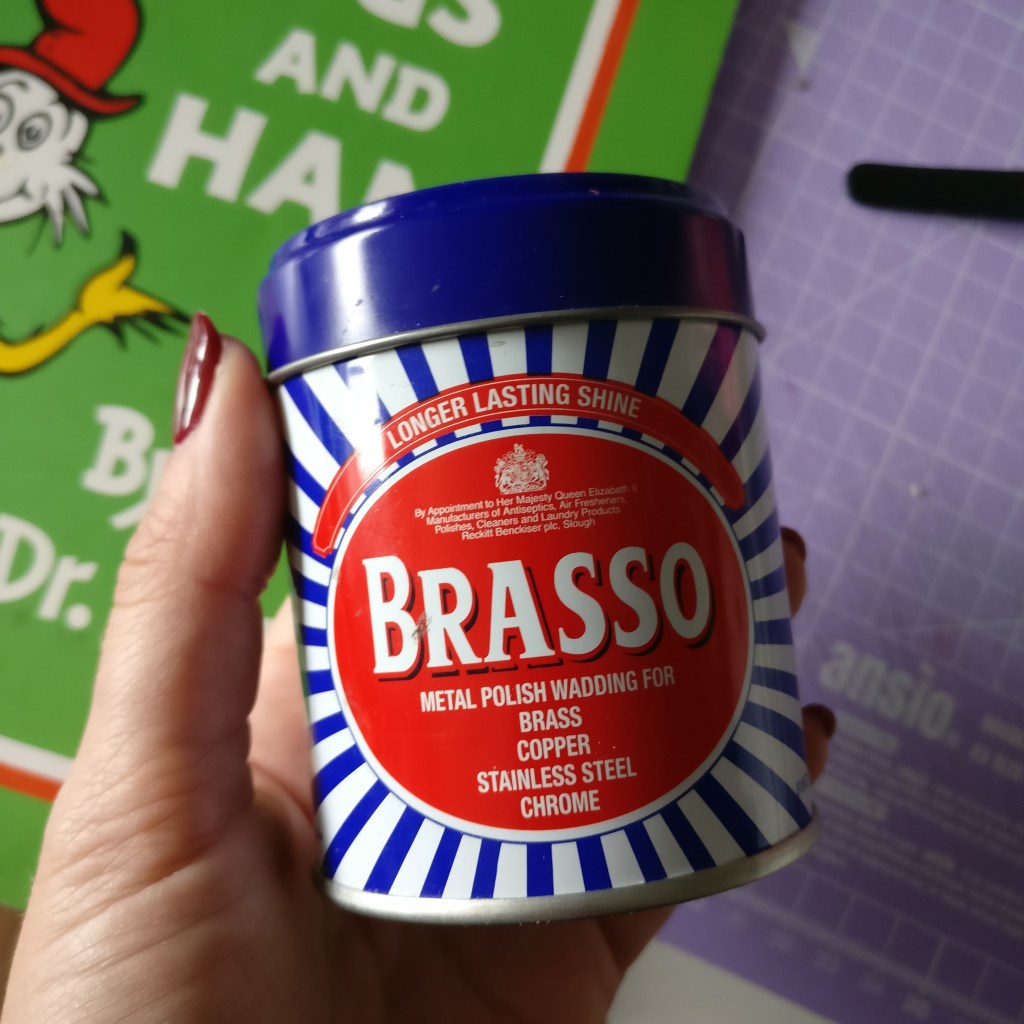
This is where I use Brasso. It is a metal polish and it’s a bit stinky but it works. Please note – use with caution! Brasso will stain paper / matt covers so DO NOT use it on them. Brasso can also remove varnish and also some laminate book coatings on vintage books (I’ve mostly noticed this on Annuals pre 1980s) but your modern day books and most Disney books seem to be fine.
Brasso comes in liquid or wadding versions, either work. You could experiment with other metal polishes too I guess. You only need a little bit, plus a clean cloth to wipe off the excess.
Put the liquid on the cloth and then using very small movements in one direction gently wipe up the glue residue. Working in one direction helps to avoid spreading it everywhere. Immediately wipe with the dry cloth and you should find that all the sticky has gone! I then like to wipe with a cloth with a fresh antibac cleaner on it, like Zoflora, to make sure it’s clean and remove any Brasso smell.
The book is now clean and ready to be made into a notebook
There are lots of different ‘sticky remover’ products on the market, I haven’t tried them as I think some are quite costly. I’ve only mentioned the ones I’ve used.
Nail Varnish remover can work some of the time, but not always. And it ruins my nails! Although it is good for removing biro and marker pen from laminated books!
If you are trying to remove stickers from varnished or painted furniture, then I would recommend using the sticker remover pen before any peeling as any attempt to pick may result in varnish / paint being removed from the furniture.
I have been recommended furniture polish for removing stickers – possibly on furniture, yes, but I wouldn’t use it on my books. Even a small spray would deposit far too much product onto my cloth; but I can see it could work for large surfaces.
Sometimes the sticker just wins…
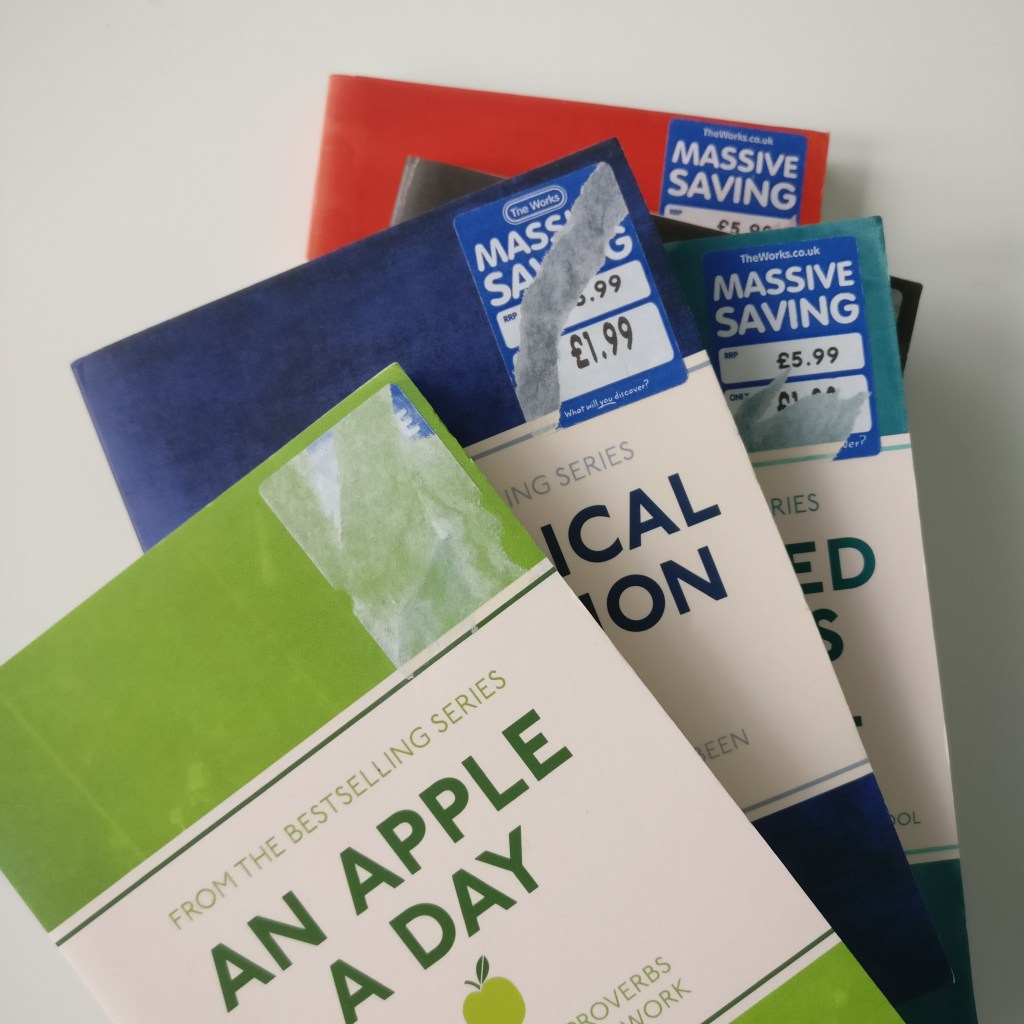
Finally, there will always be a sticker that beats you. I have met that sticker very recently. I picked these books up in the charity shop but they were originally from The Works. Their stickers are pure EVIL! I won’t give in though. There has to be a way to get their stickers off … watch this space…
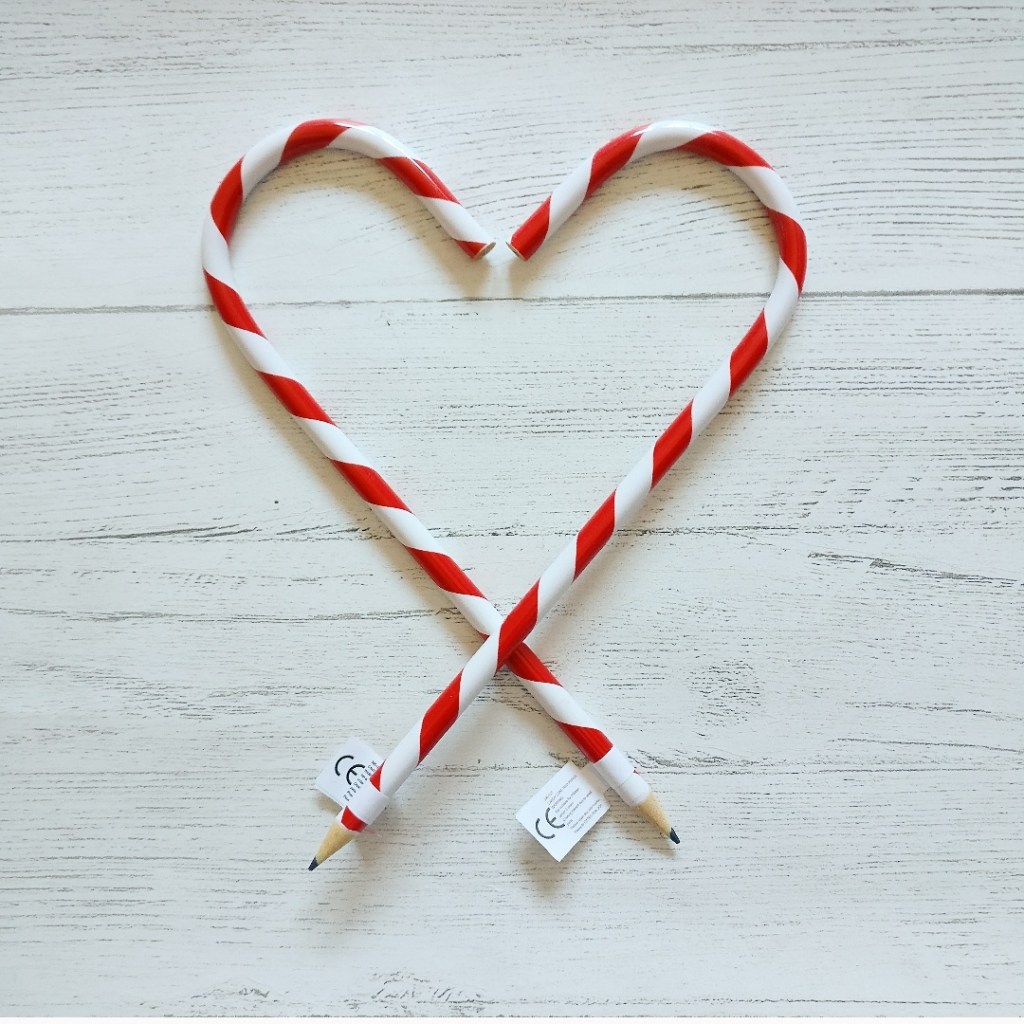
With new Christmas Candy Cane Pencils entering my shop this week, it got me thinking about why I LOVE pencils so much.
If you make a mistake you can rub it out!
Although you have to sharpen them, they can last for ages; unlike a pen which can dry out, or quickly run out of ink.
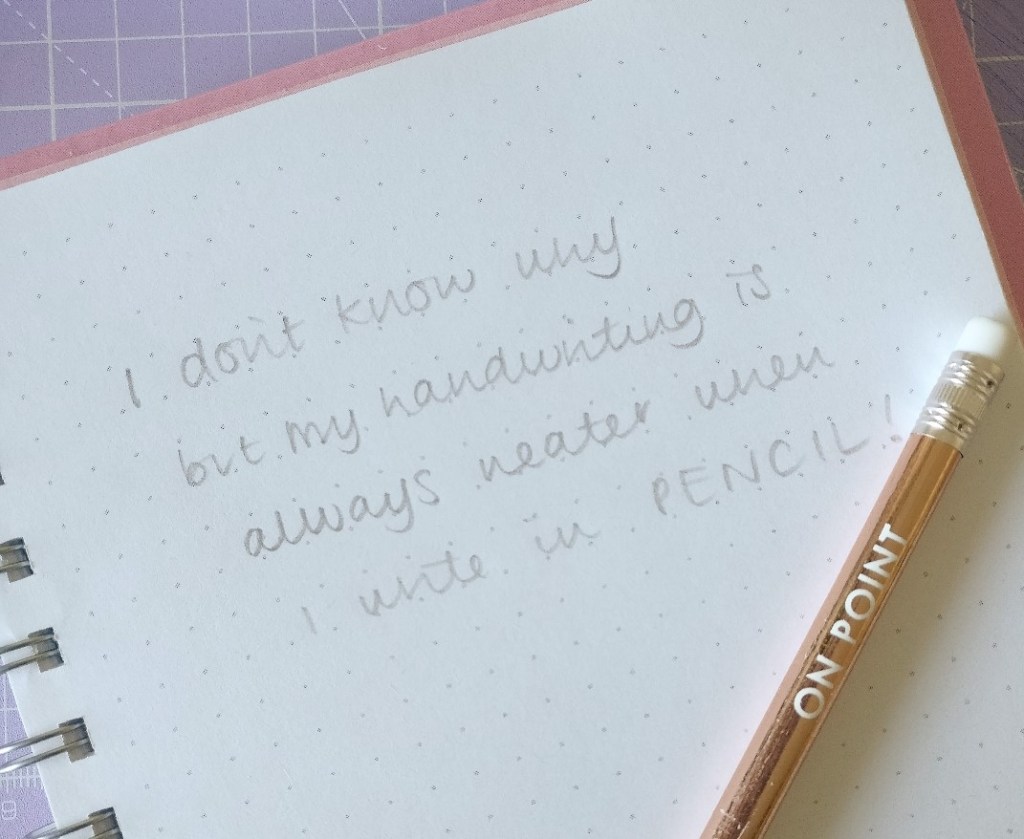
But my main love for pencils is because using a pencil makes my handwriting ten times neater. Anyone else?!
The idea of the pencils date back to the 1500s when graphite was discovered in one of my favourite places in the world, The Lake District. (I visit there every year, it’s like my second home!) But the pencil as we know it wasn’t manufactured in Keswick, until 1832.
If you ever visit the area, do make sure you visit the Pencil Museum. My favourite artefacts there include the wartime pencil which contains a map of Germany and a compass inside it! And the museum also has the largest colouring pencil in the world.
The only photo I could find of me in the museum, taken back in 2007, it’s had a refurb since then and I can’t wait to return next year!
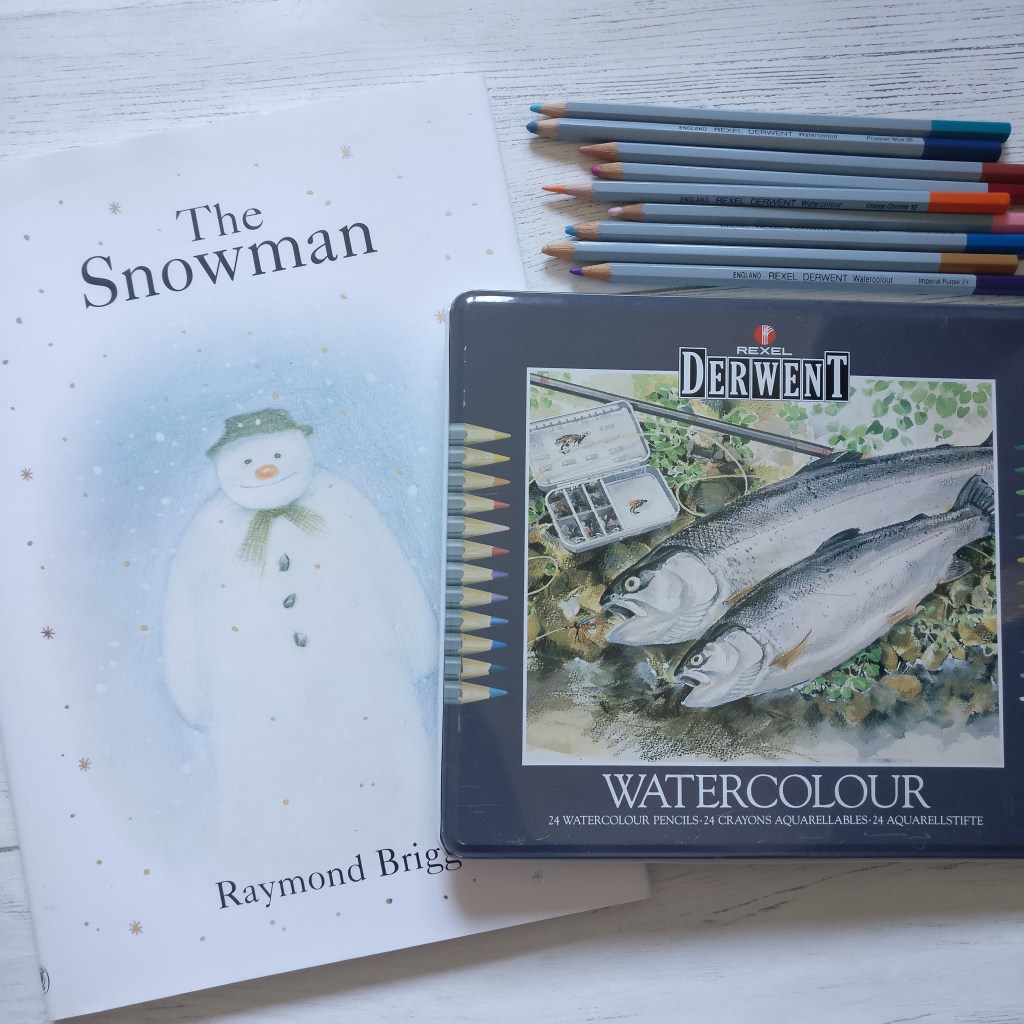
Did you know Derwent colouring pencils were actually used to draw all the images in The Snowman animation? And I use Derwent watercolour pencils to help restore some of my notebooks!
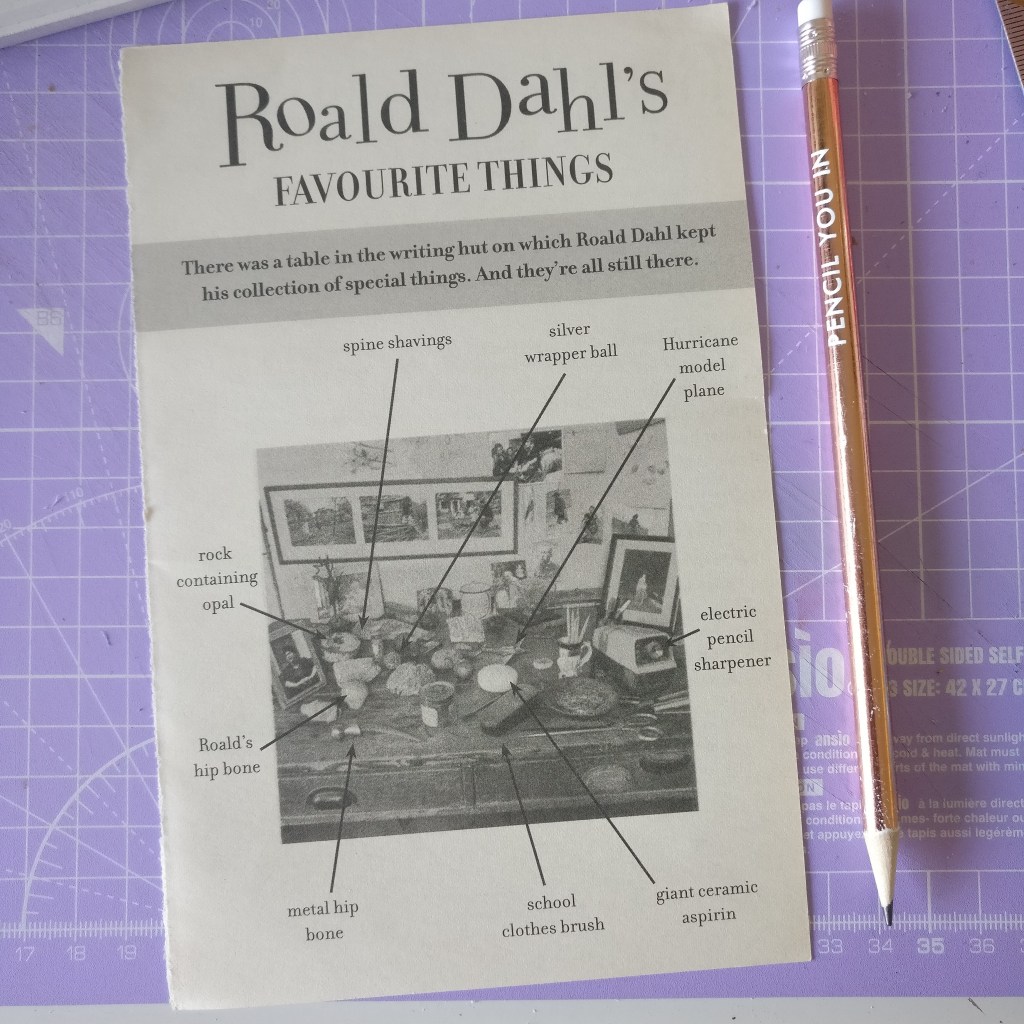
Roald Dahl ALWAYS wrote in pencil, so if it’s good enough for him… right? He always used a particular kind of yellow pencil with a rubber on the end. Before he started writing he made sure he had six sharpened pencils in a jar by his side, each lasting two ours before they needed resharpening in his electric pencil sharpener!
There are so many pencils to choose from, but you can’t beat a good HB. I don’t mind a mechanical pencil I do find it annoying when the lead becomes too small and keeps popping back up inside the pencil!
Although its a wonderful idea to make pencils from recycled materials, do be sure to check the leads as I often find that some do not write as well.
In my opinion you can’t beat a wooden pencil – but be aware of cheap pencils – they may write well but the erasers on the end often smudge and they tend to crumble when they are sharpened.
And finally remember to look after your pencils and try not to drop them, there’s nothing worse than a broken lead which requires constant sharpening!
I’d love to know if there are more pencil lovers out there! Get in touch!
I’ve always been conscious about our environment. I grew up living opposite a forest full of wildlife; at University I studied Environmental Science as well as Archaeology; and I now run my own business which re-purposes old books.
But this year we have seen a huge focus in the media on reducing plastic waste – and rightly so. A quick Google search will give you all the facts and figures, but here are the very few small changes that I have made to reduce plastic.
Very quickly I just want to say this is not an ad, all items were purchased by myself and any businesses mentioned are merely my own recommendation. Okay let’s move on…
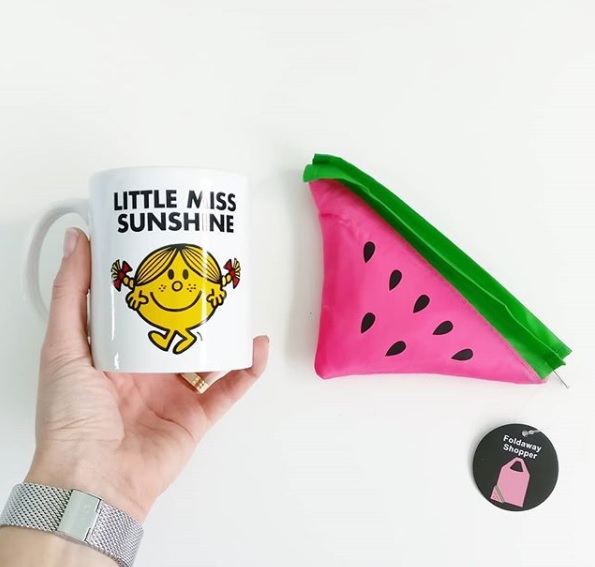
1.The reusable bag
What I love about this bag so much is that I swapped it with an unwanted Christmas gift (A duplicate Little Miss Sunshine Mug) at my local WI group. I also love the fact it’s a watermelon, and that it folds down really small but is really strong and is easily filled with books on an impromptu visit to the charity shop!
I also carry a spare in the car boot just in case!
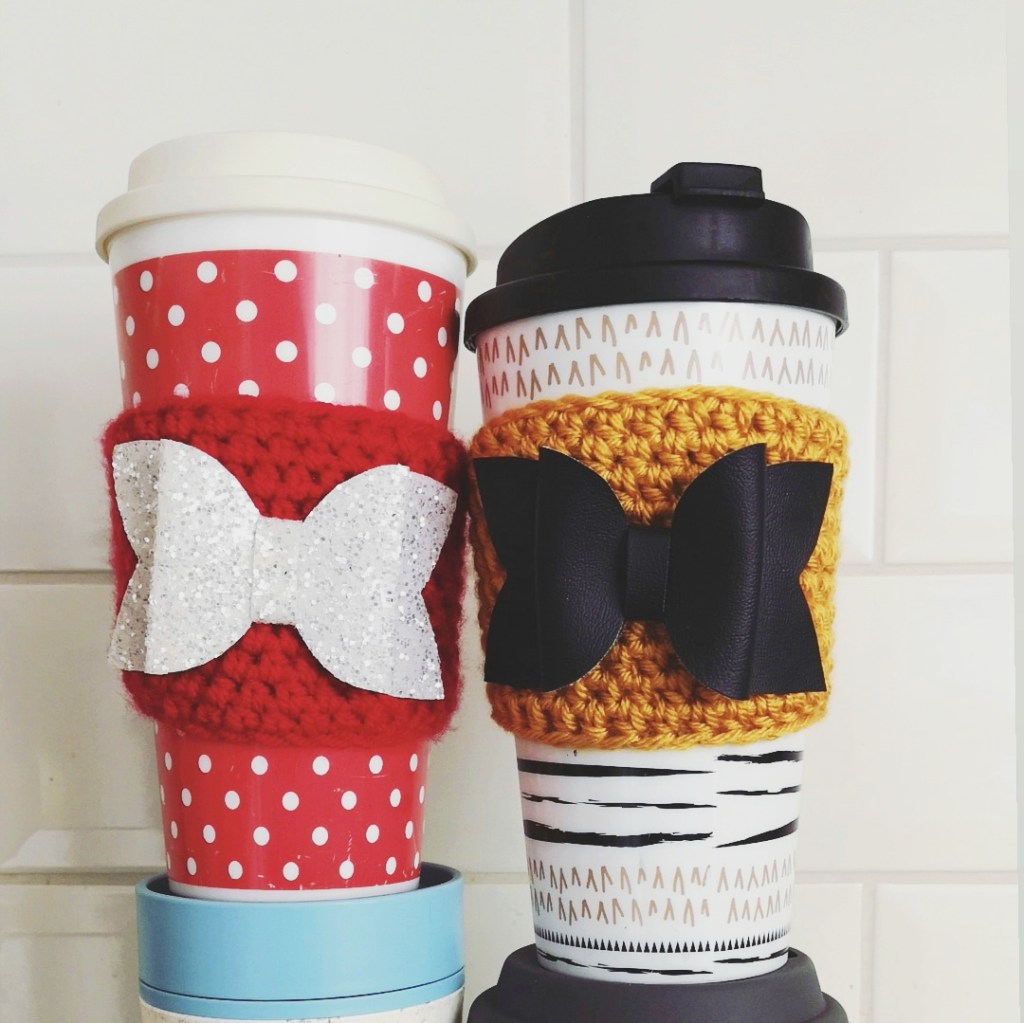
2. The reusable coffee cup
Coffee Cups (from Primark) with beautiful handmade cozies by The Fun Impossible – Laura also make lots of other environmentally friendly products
I love coffee. And I drink lot of it, so a reusable cup immediately helps reduce coffee cup waste. Although coffee cups can be recycled , it’s not an easy process and there are only a few places in the country that have the machines to specially remove the plastic lining from the paper outer.
I may invest in a collapsible cup as I do find when out and about they do take up a lot of space in my bag. I always get lovely comments on my cup cozies by The Fun Impossible.
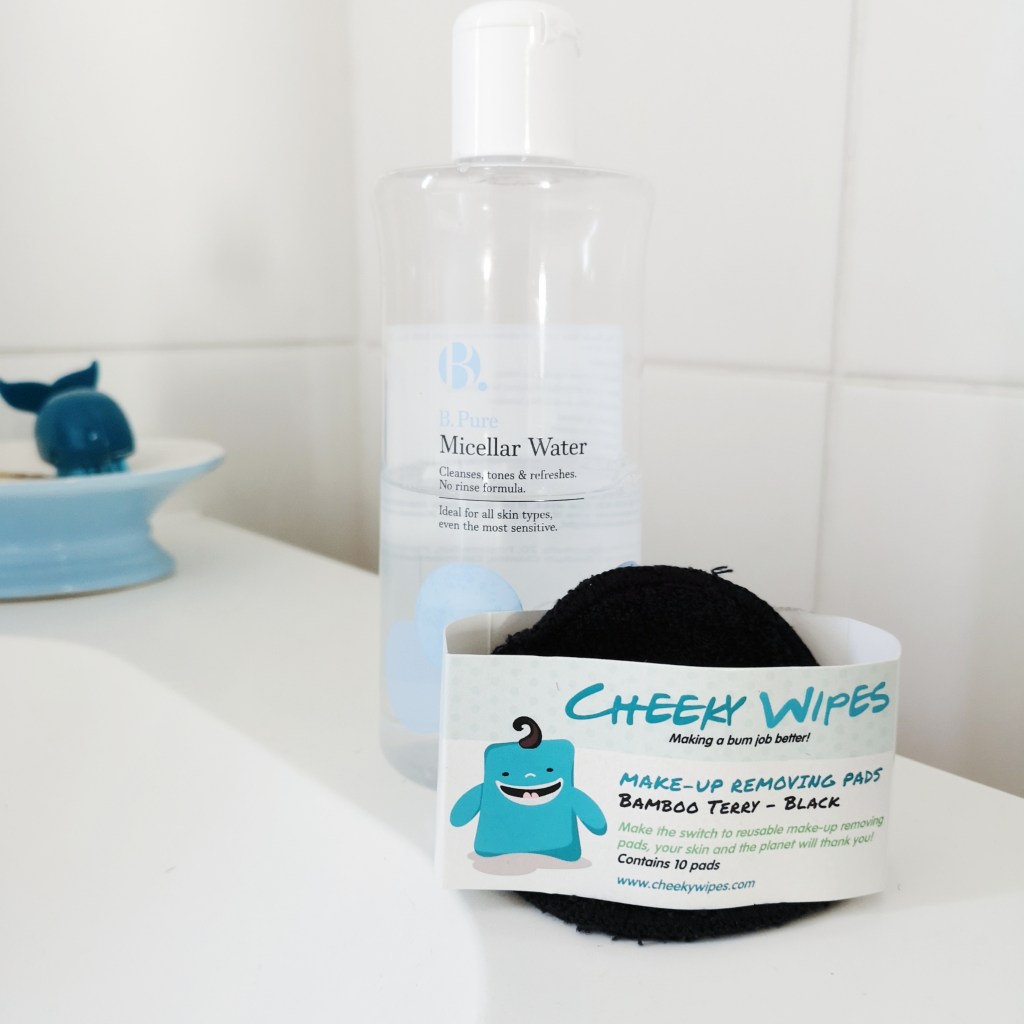
3. Cheeky Wipes Cosmetic Pads
Cheeky Wipes Cosmetic Pads
These wipes have replaced my cotton wool pads and have made me wonder why we ever use cotton wool pads? Once upon a time I’d have used a flannel, but as I like to use Micellar Water these days, a flannel is just too big.
The Cheeky Wipes bamboo towelling pads come in black (and hide any mascara stains) they come in packs of 10 and can be popped into the wash with ease. I especially love the fact that they are posted in plastic free packaging all of which you can recycle.
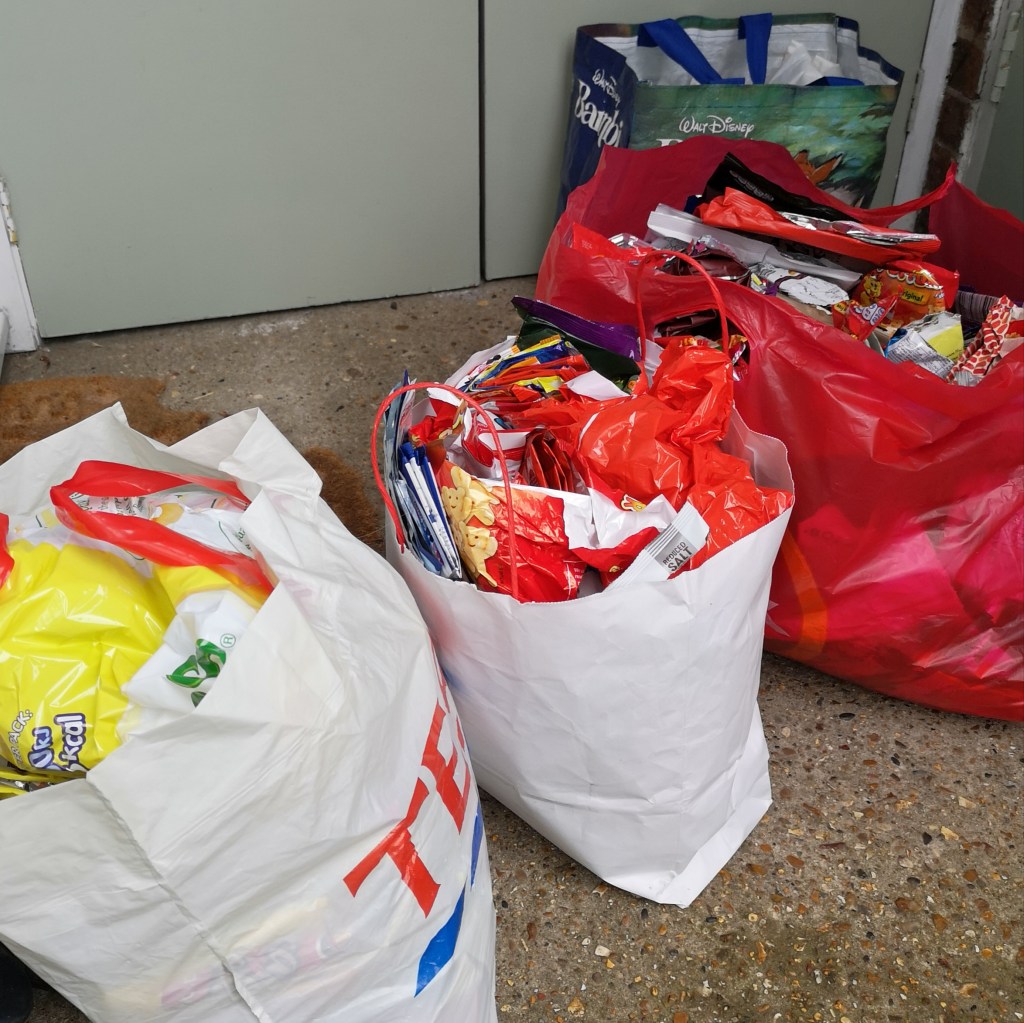
4. Crisp Packets
Look up your nearest Walkers crisp packet recycling point
No, I’ve not found an alternative to the crisp packet, nor have I stopped eating crisps (shh don’t tell my Slimming World consultant 😉 ) but I have stopped putting them in the general waste. Even though my local council won’t recycle them I now volunteer to recycle the crisp packets for our local WI, and at the last meeting we had well over 300 packets to drop-off at the nearest Walkers Crisp recycling centre. Throughout the month I store the crisp packets in a tin in the kitchen.
Walkers have teamed up with Terracycle and have hundreds of bins in schools and public places over the country that can recycle ANY crisp packet – doesn’t have to be Walkers – check out their website for more details.
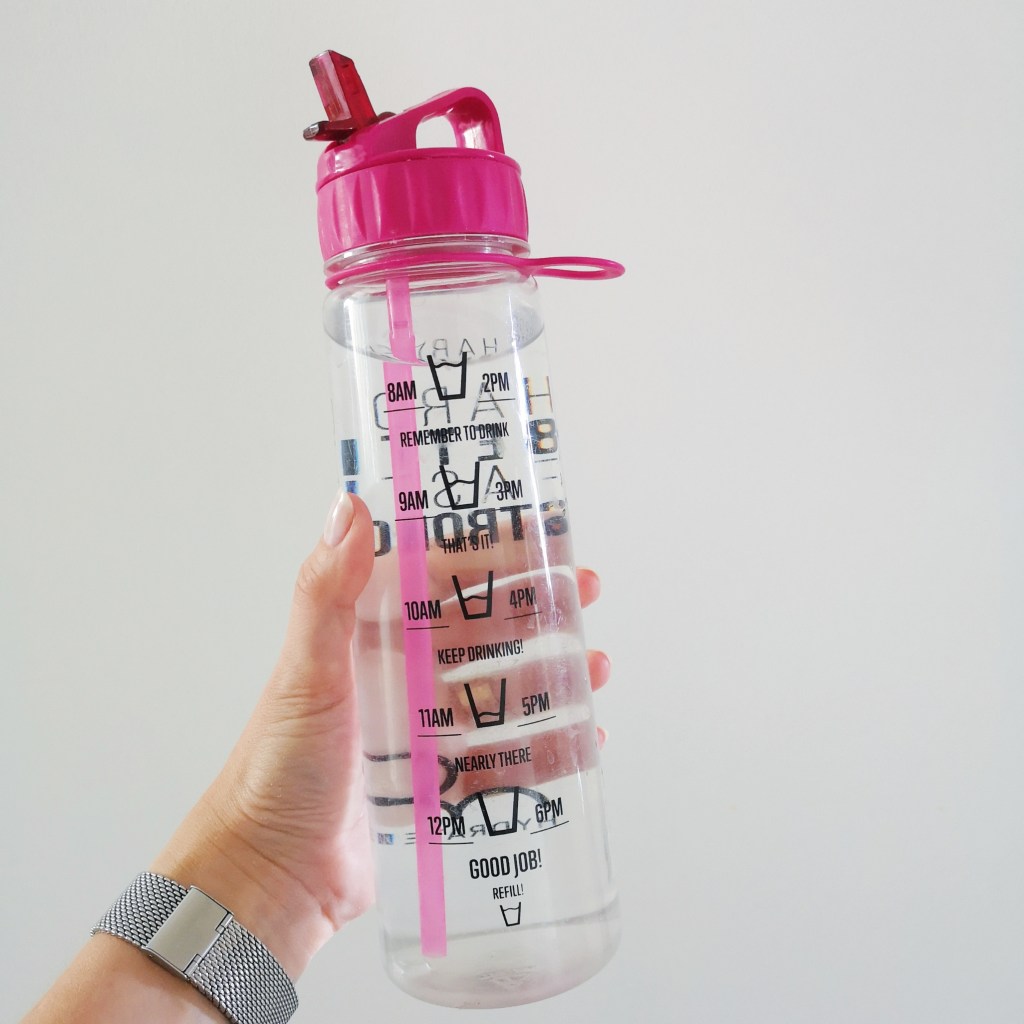
5. Re-usable water bottle
My water bottle from Hydratem8 is a few years old now and still going strong!
I cannot remember the last time I bought a bottle of water… I’ve had my Hydratem8 for a few years now and can’t fault it. Yes it’s made of plastic but I’ve had plenty of use from it and plenty more to come I hope!
I especially love the fact that it helps encourage me to drink more water. And now with so many businesses signing up to the refill scheme it’s easy to get free water all over the country!
6. Swapped Wipes for anti-bac spray and cloths
A no brainer. If you haven’t watched BBC’s War on Plastic with Hugh and Anita then I really recommend you do. The wipes problem isn’t only a large cause of fatbergs in our sewers but they are hugely contributing to the plastic problem. I used to use baby wipes to clean my notebooks, but now I use a diluted antibac spray and a cloth – just dampen the cloth and wipe. Simple! And saves me money too!
There are lots of other ways to help reduce plastic, these are my main ones which have made very little impact on my normal daily routine. Please feel free to share your tips or let me know if this has inspired you to make a change and help reduce plastic waste.
“I don’t want to ruin it, it’s too nice!” Anyone else feel like this about using their notebooks?! I know I have! But as lovely as your notebook may be, they are there to serve a purpose and we should use them! To get the most out of your notebooks and prevent damage, here are my top 5 tips on caring for your books.
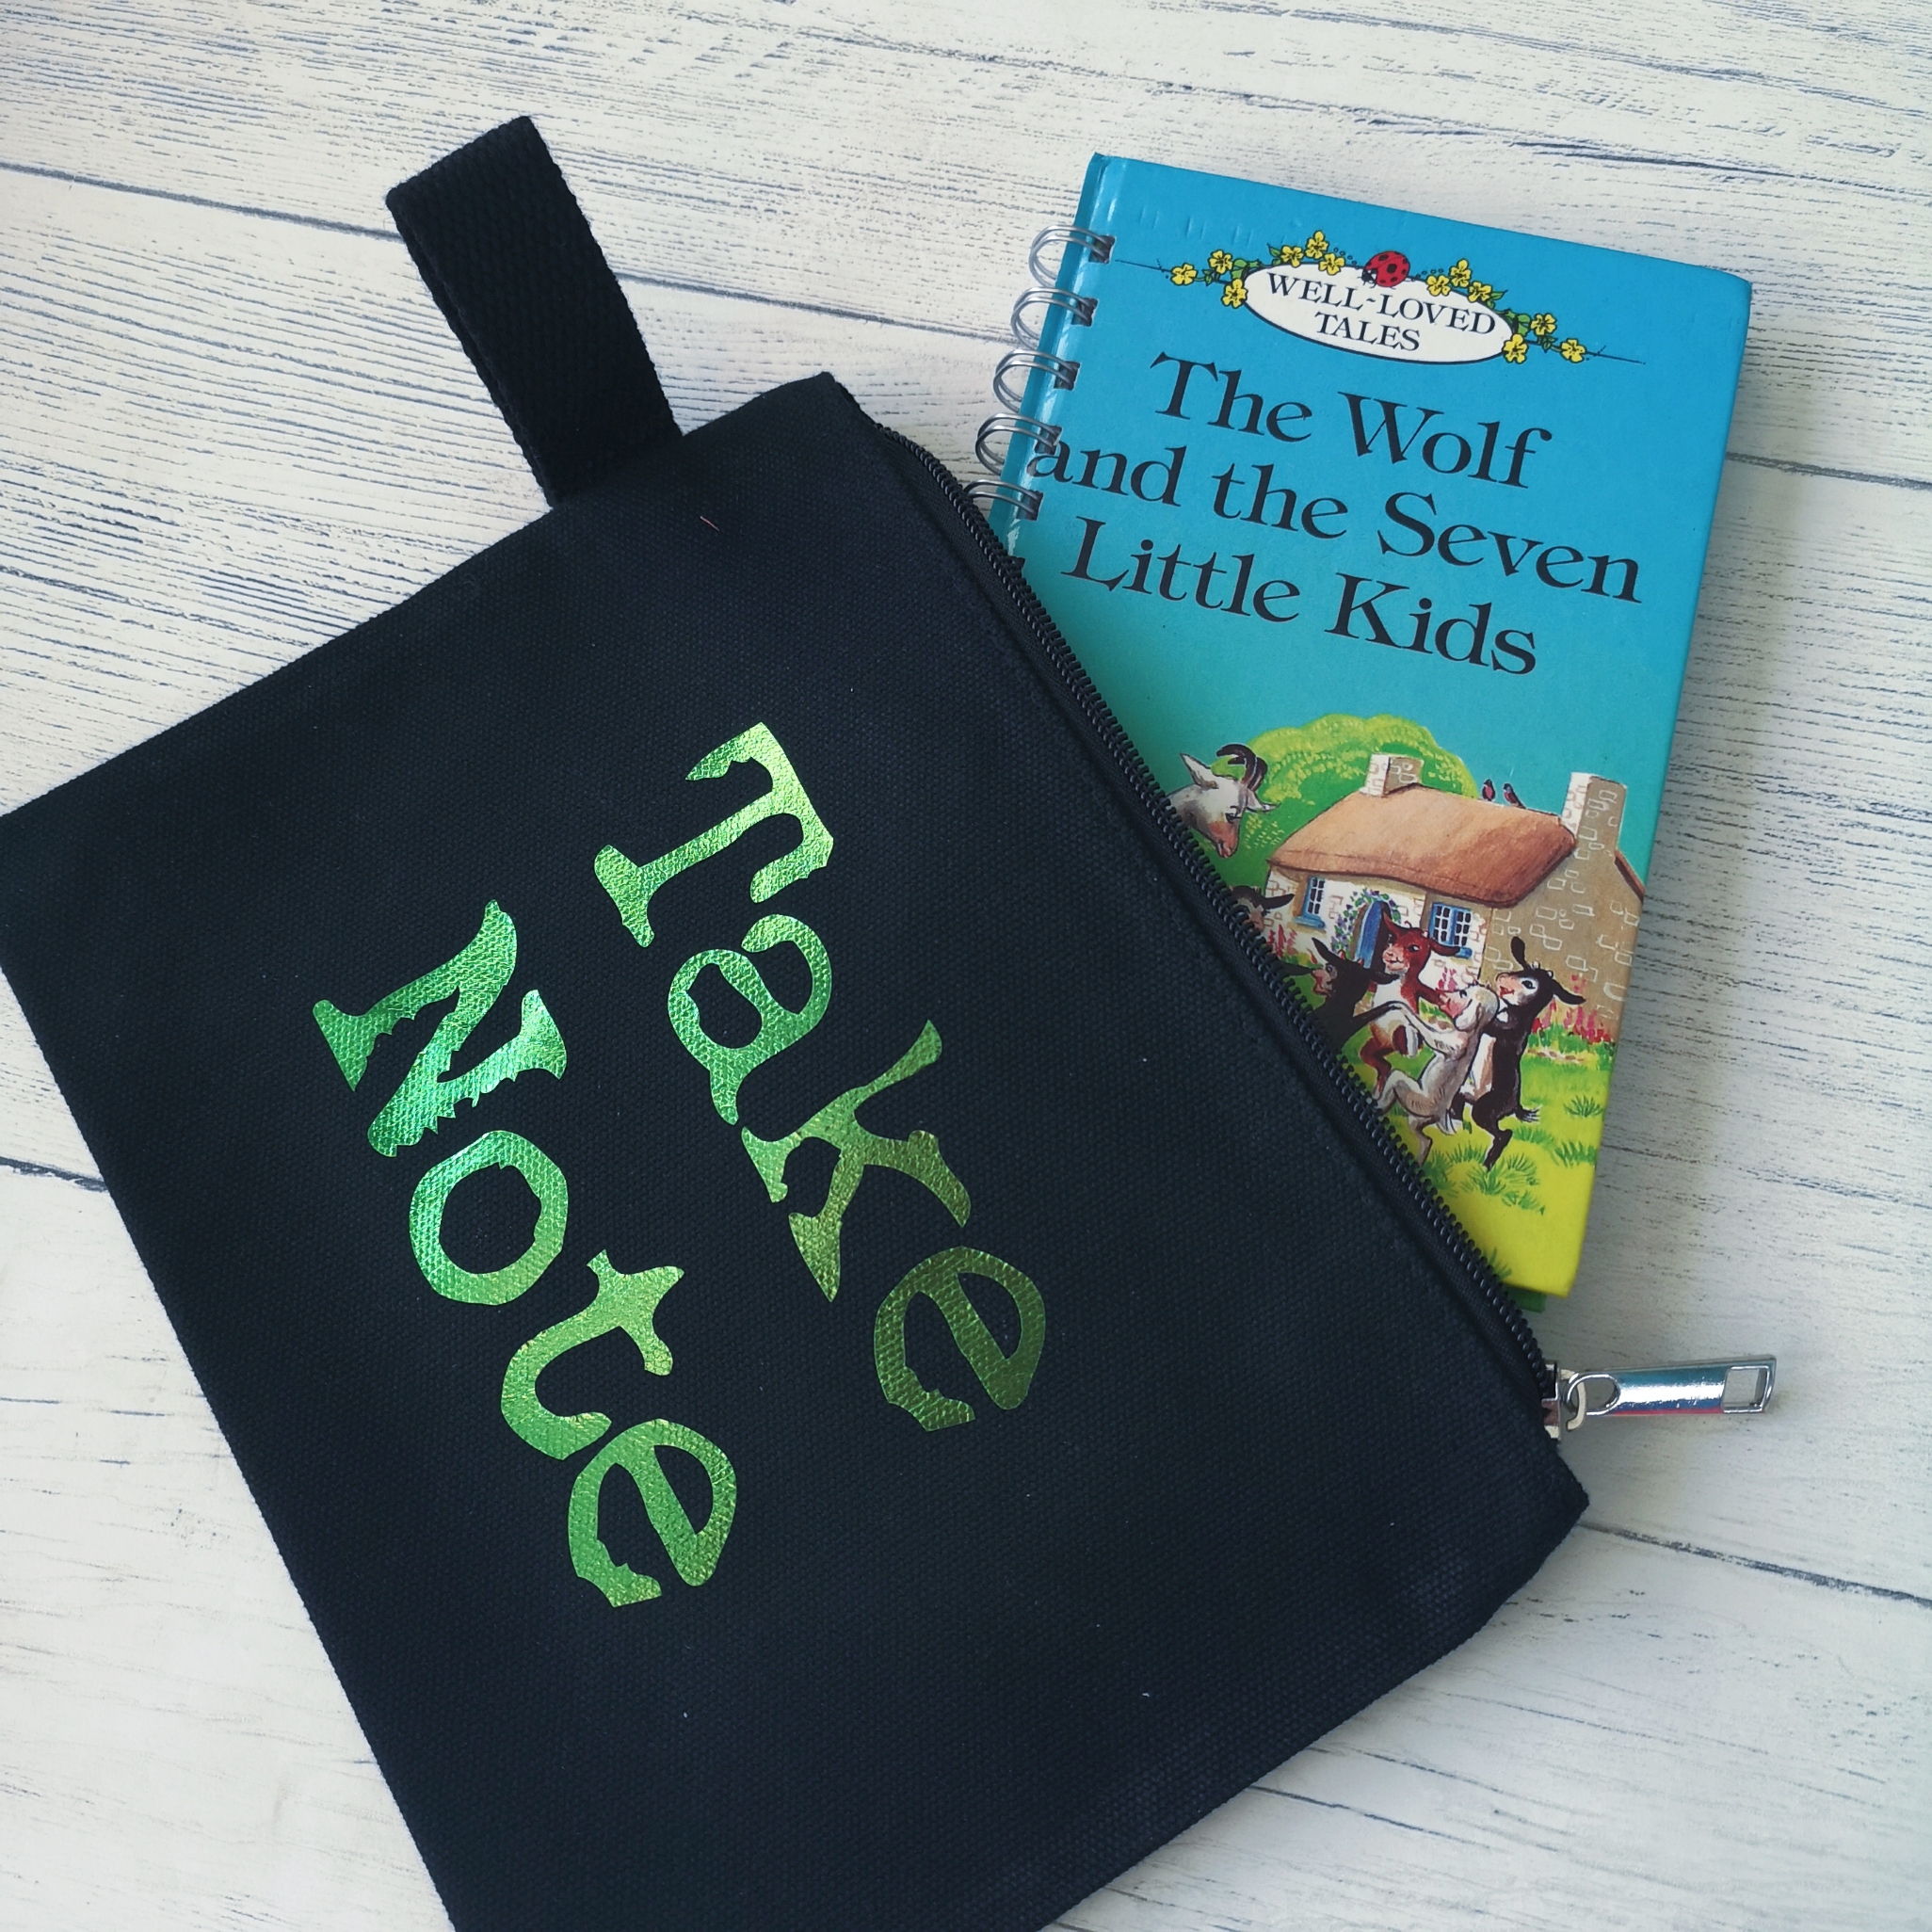
1. Pop your notebook in a book pouch.
A pouch will protect your notebook from the other contents of your bag. I purchased a canvas bag and personalised it with an appropriate phrase in my Retro from Scratch font! You can buy book pouches online or you make one easily yourself – there are plenty of tutorials out there. Or maybe I should start supplying them in my shop?
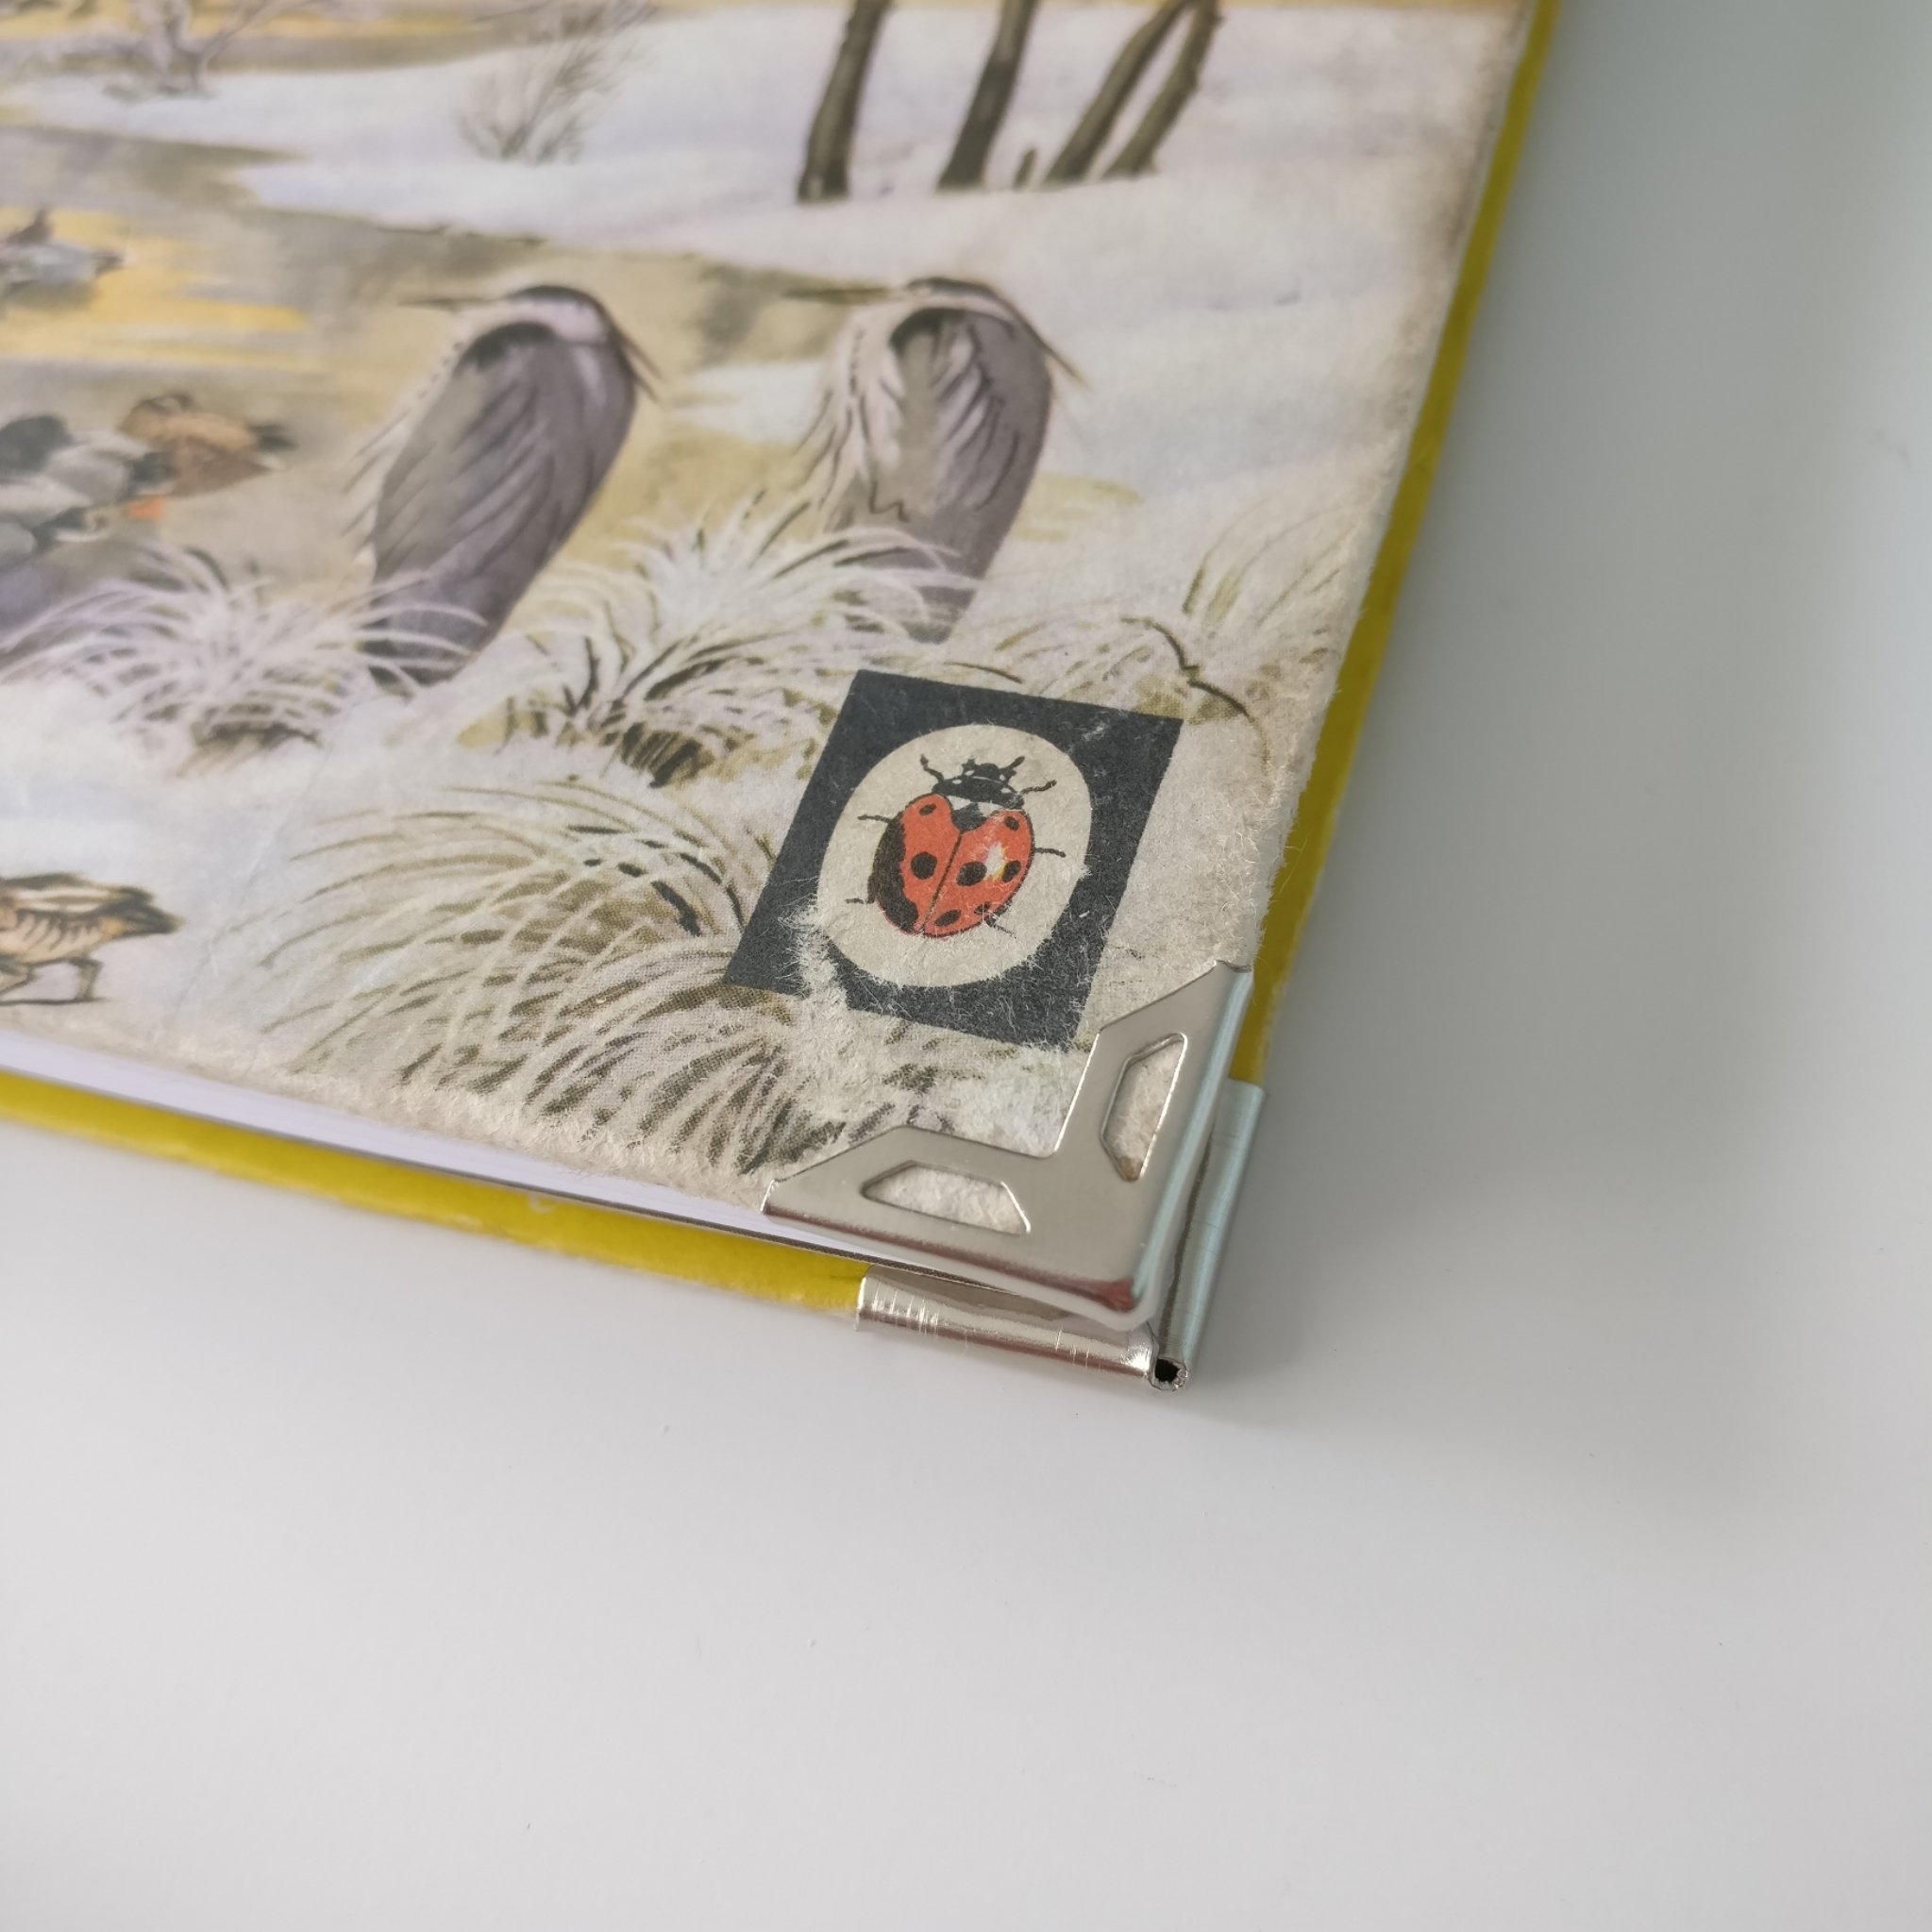
The corners are a really vulnerable part of the book and often the first area to show wear. Adding metal corners makes them super strong and keeps your notebook looking neat!
3. Keep them clean.
If you have a plastic coated notebook, apply some antibacterial spray (I like to use a very diluted Zoflora) to a cloth and gently wipe over your notebook cover. Never spray the book, and don’t attempt this on a paper / matt cover!
4. Don’t stick a pen in the spine!
I know it’s so easy to do, and convenient but the pen can bend your notebook wire out of shape and cause even worse damage if you open your book without removing the pen from the spine first!
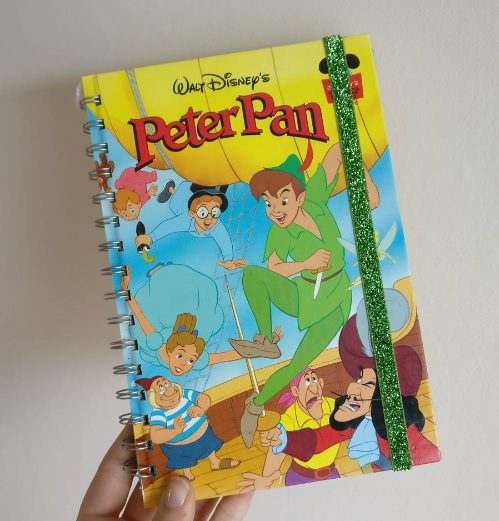
My elasticated book bands not only add a bit of sparkle and make my notebooks look pretty, but they serve a practical purpose. They hold your book together, preventing it from opening in your bag and getting damaged. And they can also be used as a handy bookmark!
It is of course inevitable that your notebook will eventually come to an end when you’ve used up all the paper. My top tip? Buy another one!
Meal Planning with my favourite Papermate Flair Pens and my essential re-bound Food optimising book
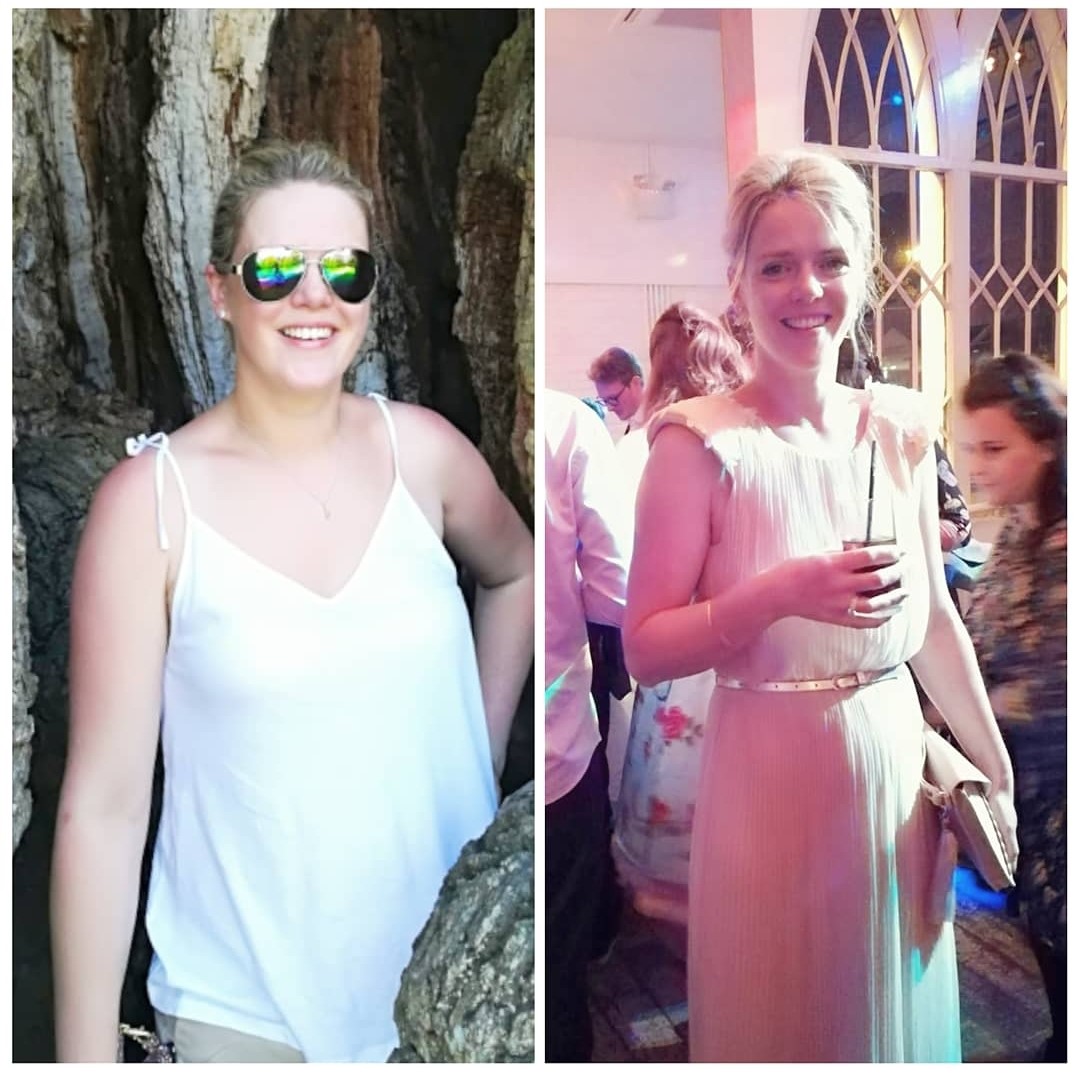
Two years ago I joined Slimming World on a mission to get back into my size 10 clothes. I succeeded within only a few months. My secret to losing that weight was meal planning. Whether you’re doing Weight Watchers, Slimming World or just counting calories, planning really plays an important part.
My meal planner has a week overview which is perfect for those of us that get weighed weekly. Divided into the three main meals of the day, it also has a column for snacks and notes.
You don’t need to waste time colour coordinating your planner – although I am a visual person and I found this helped me to see quickly if I was planning enough speedy and protein foods in balance with free foods and synned food.
You might be thinking that planning your food for the week ahead sounds too restrictive. What if you don’t fancy an omlette for lunch on Monday? How will you know what you might fancy for dinner next Thursday?! Remember meal planning is only a guide. You are writing down your ideal weekly meals – you won’t break any laws if you change it!
I found the SW plan relatively easy to follow. Until it came to the A and B choices! If I didn’t plan I would find myself having a B choice for breakfast and then accidentally using my B choice again for lunch – so then I’d have to syn it and if I’d had a chocolate bar as my mid morning snack, next thing you know I’d gone over my syn allowance!
Those beautiful B choices…
So by writing it down I could work out what breakfasts and lunch would work together, and that allowed me to then ‘mix it up’ so I wasn’t having the same breakfast and the same lunch everyday – which I think is really important. Food shouldn’t be boring.
Meal planning allows you to work around other engagements that involve food – weddings, birthday parties, drinks after work etc… If you know it’s coming you can be prepared and then ‘be good’ the rest of the day / the day after – without starving yourself!
Planning your meals also helps prevent food wastage – you can use your meal plan to shop the right groceries that you need. If it’s not on the list then maybe you shouldn’t be buying it! And if it is on the list, you hopefully won’t forget it!
Whilst using my meal planner I also kept a food diary. Remember, they are two different things! The planner is what I HOPED to eat, the diary is what I ACTUALLY ate!
But what I would do, is look back in my food diary where I had a good weight loss that week and re-write that week out in my meal planner, so that I could try and repeat it. It worked before so why shouldn’t it work again?
I wrote my best weekly weight loss in my meal planner to help me with future weeks and I still look back on this now.
You can of course use my meal planners as a week per view food diary too. They come in all different sizes from Ladybird Book size, 11 x 17cm (£8) to A4 (£12) – all you have to do is choose which book cover to have it in!
Before and after I lost nearly two stone to get back to my Slimming World target weight
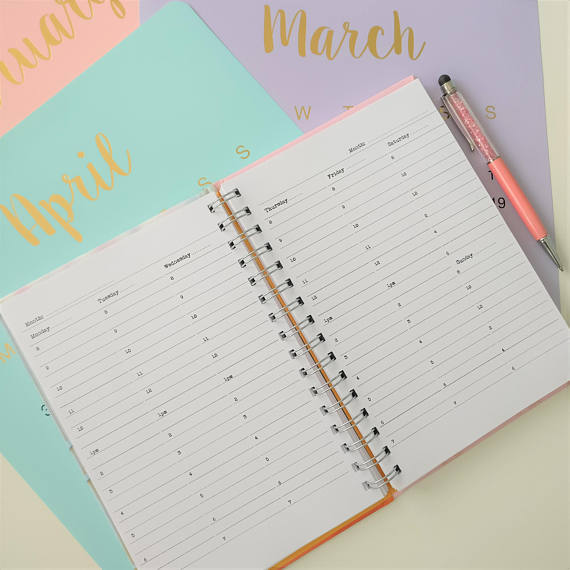
As the new Academic Year approaches, the choice of diaries can become slightly daunting! Here is my quick guide to help you choose which style of diary page is the perfect one to keep you organised all year round!
The Page a Day Diary
If you’ve got a lot to write then this diary is perfect, especially as a ‘Dear Diary’ or a desk diary, because with 365 days in the year this diary is a relatively heavy book and something you probably don’t want to be carrying around every day.
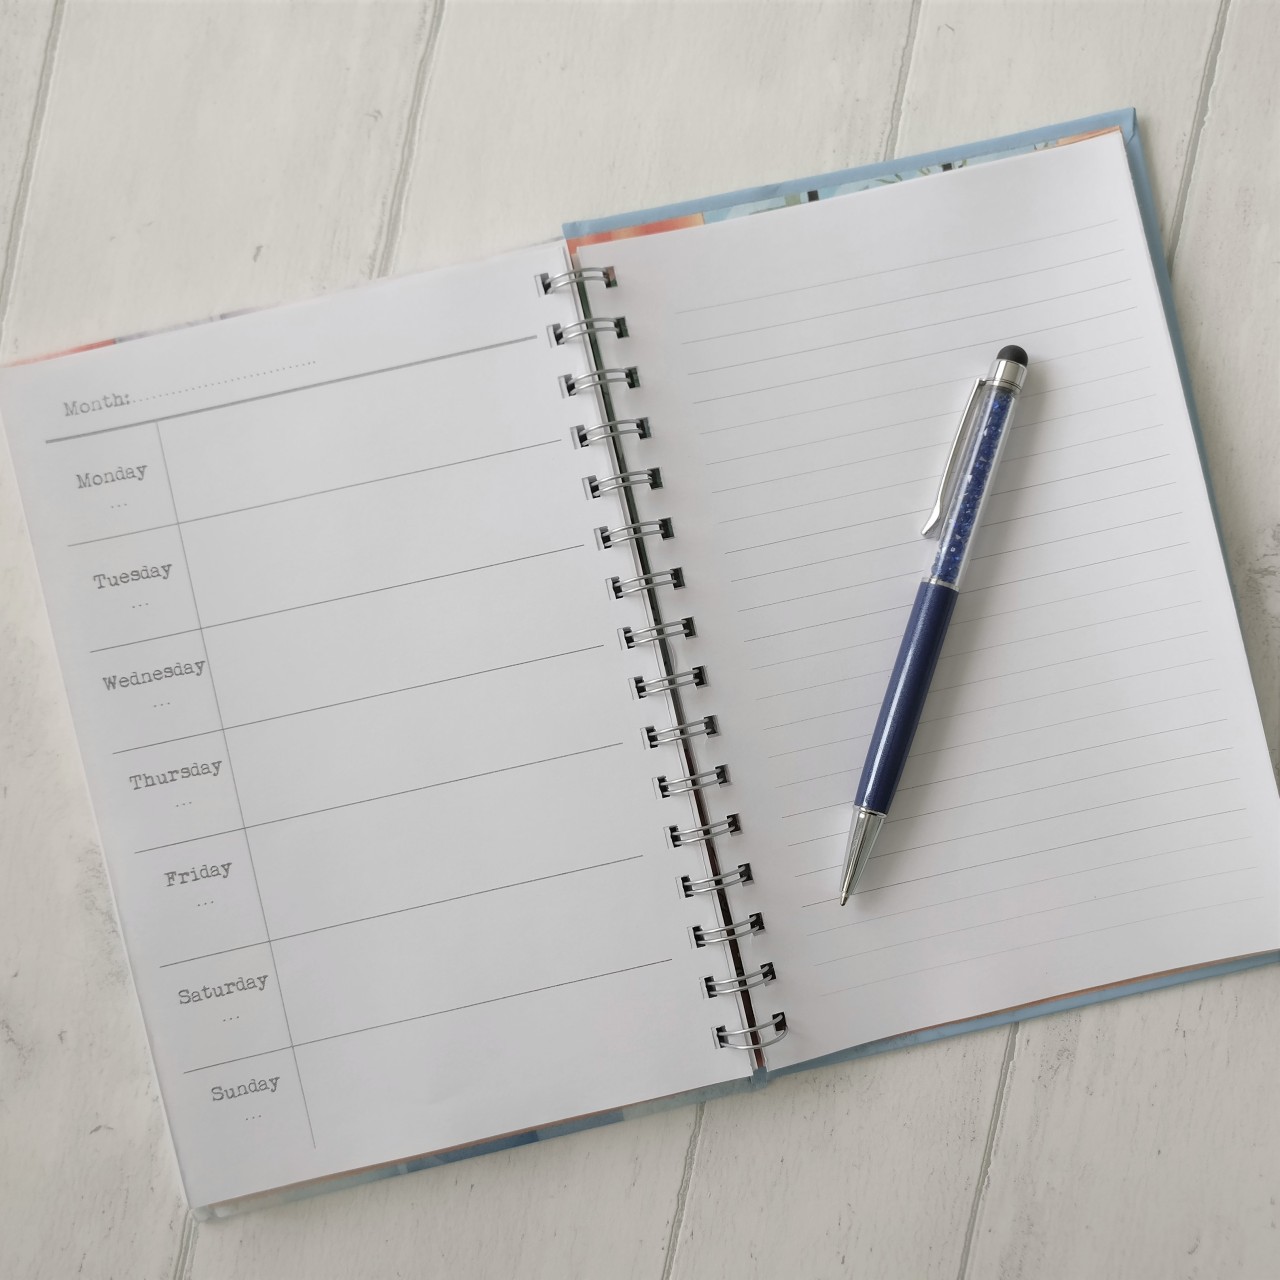
The Week per View
A classic, you can’t go wrong with a week per view. It’s the most popular of all my diaries, ideal for home, work or school but if you have a lot of appointments you might prefer…
The Vertical Diary
Never miss a meeting again with a vertical diary – you can list all your appointments in time order, each day. Perfect! Nice and light to show off carry to meetings.
The Week Per Page
It’s a diary and a notebook all in one. Great if you don’t have big handwriting and you love making additional notes for the week.
My ‘Pippa’ Work / Home Diary
Designed by one of my customers, Pippa; this is perfect for those that want to carry their work and home life in one book. Every four weeks there is a page of lines for notes, and a four week overview page, before four weeks of weekly pages. That’s a lot of weeks in one sentence – but enough to fill a book for a year!
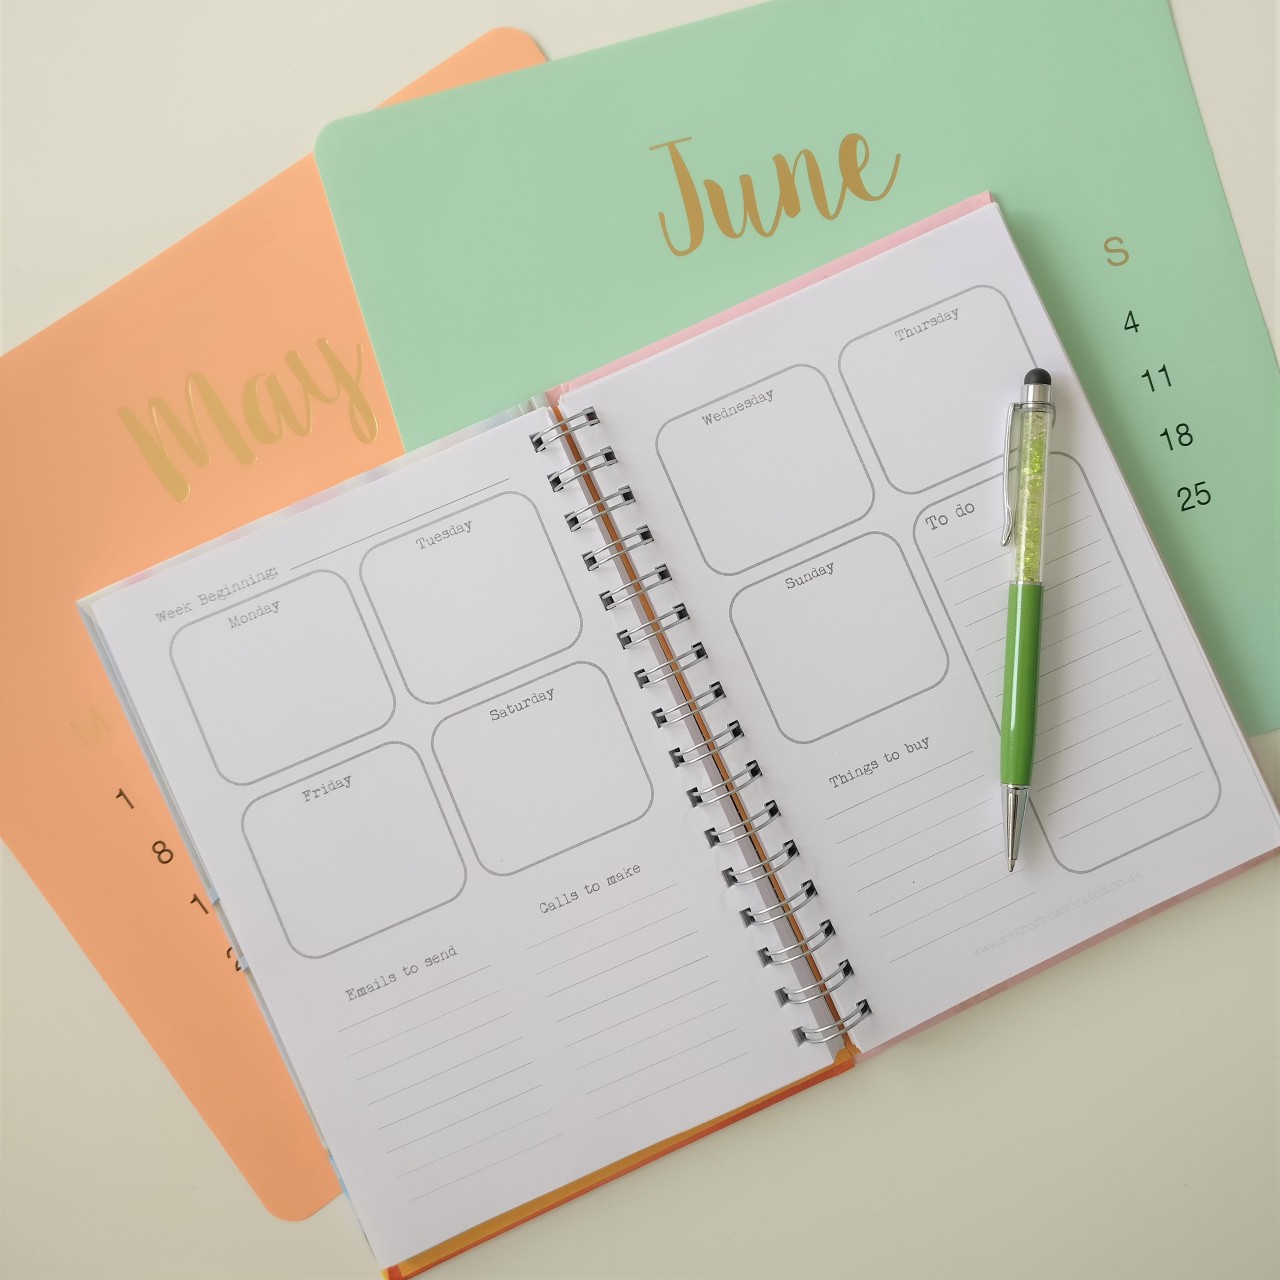
The Weekly Planner
If you are more of a planner – then this might suit you better. Feel completely in control of your life with this week per view diary but with dedicated space for those important Emails, calls to make, things to buy and things to do…
And finally…
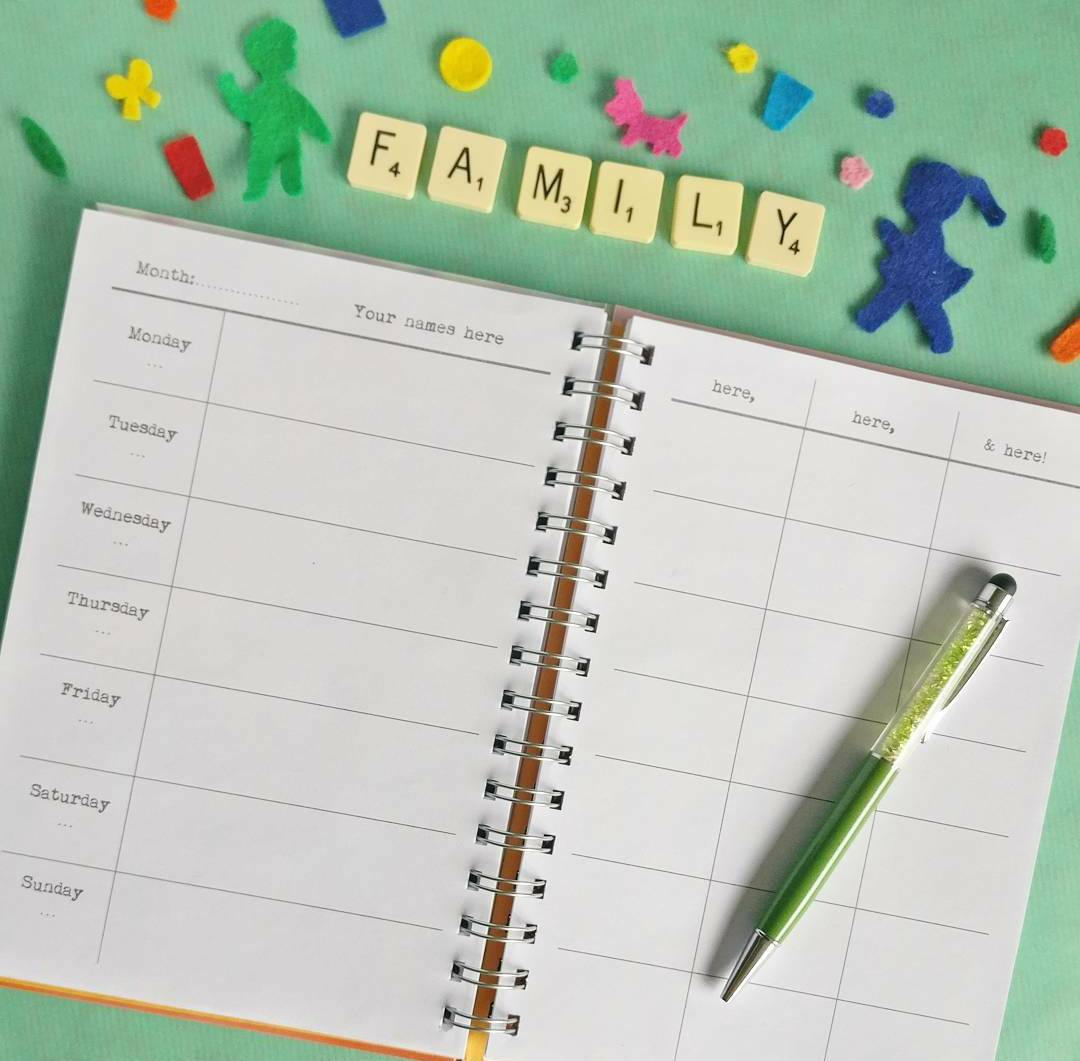
The Family Organiser
If you have to organise more than one person in your life then this is for you. With up to six personalised columns, you can separate all the kids activities, the dogs appointments and organise your partner’s life, a week at a time without the worry of double booking yourself.
Remember all my diaries come un-dated so they can be started any time of the year! They make great gifts and with so many different book covers to choose from my shop, there is something for everyone.
I hope this has helped making your diary choice a little easier, so you can relax, enjoy the rest of the summer holidays knowing your sorted for the new school year!
Whether your loved ones make the grades (or not..) it’s time to celebrate their achievements.
August 15 and August 22 will be two of the most stressful days of 2019. Silly really because all the hard work has already been done, it’s not like a driving test, there’s nothing you can do on this day to change the results. So a little present is a lovely way to relieve the tension.
If you’re after a personal, unique and practical gift – then I think I can help.
For those going into further education…
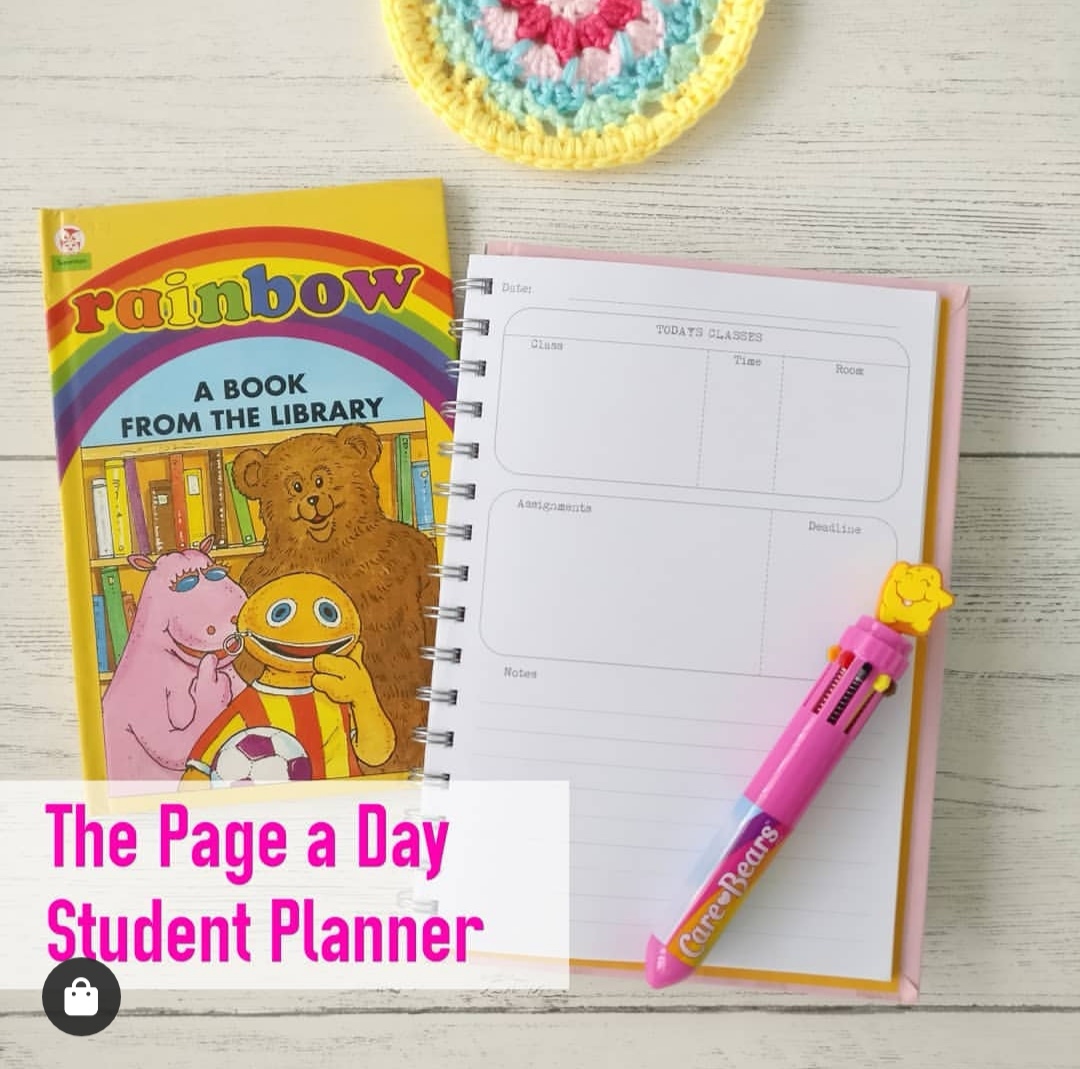
My student planners are perfect for those starting college / 6th form or University. From a weekly planner to a daily scheduler, it’s a gift they are bound to find useful. And with a planner that stands out they’ll be making new friends in no time!
For those off to Uni…
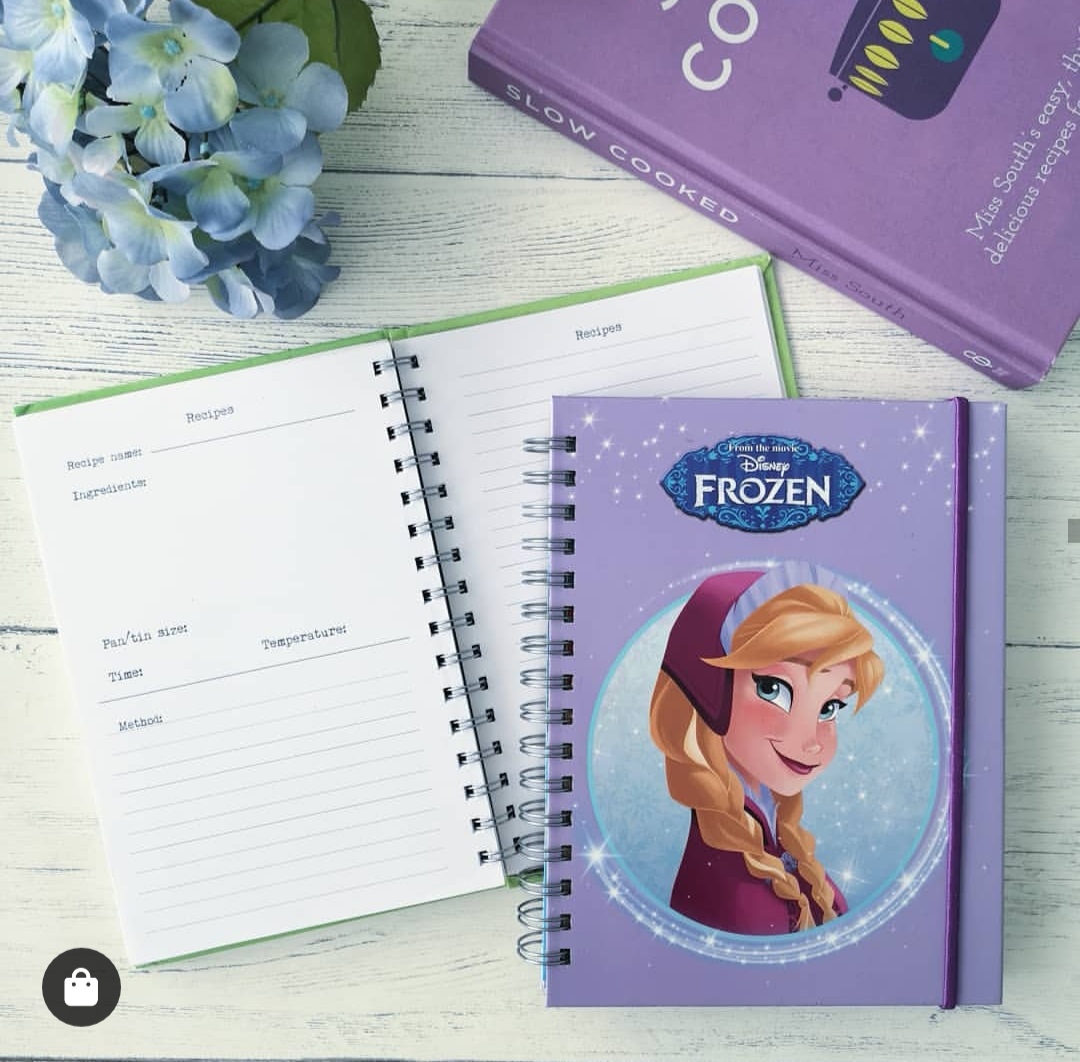
A recipe book is a really thoughtful gift – especially if you fill it with some of your families favourite recipes – you can at least hope they might use it and won’t be living off of pot noodles, beans on toast and takeaways!
For those off to work…
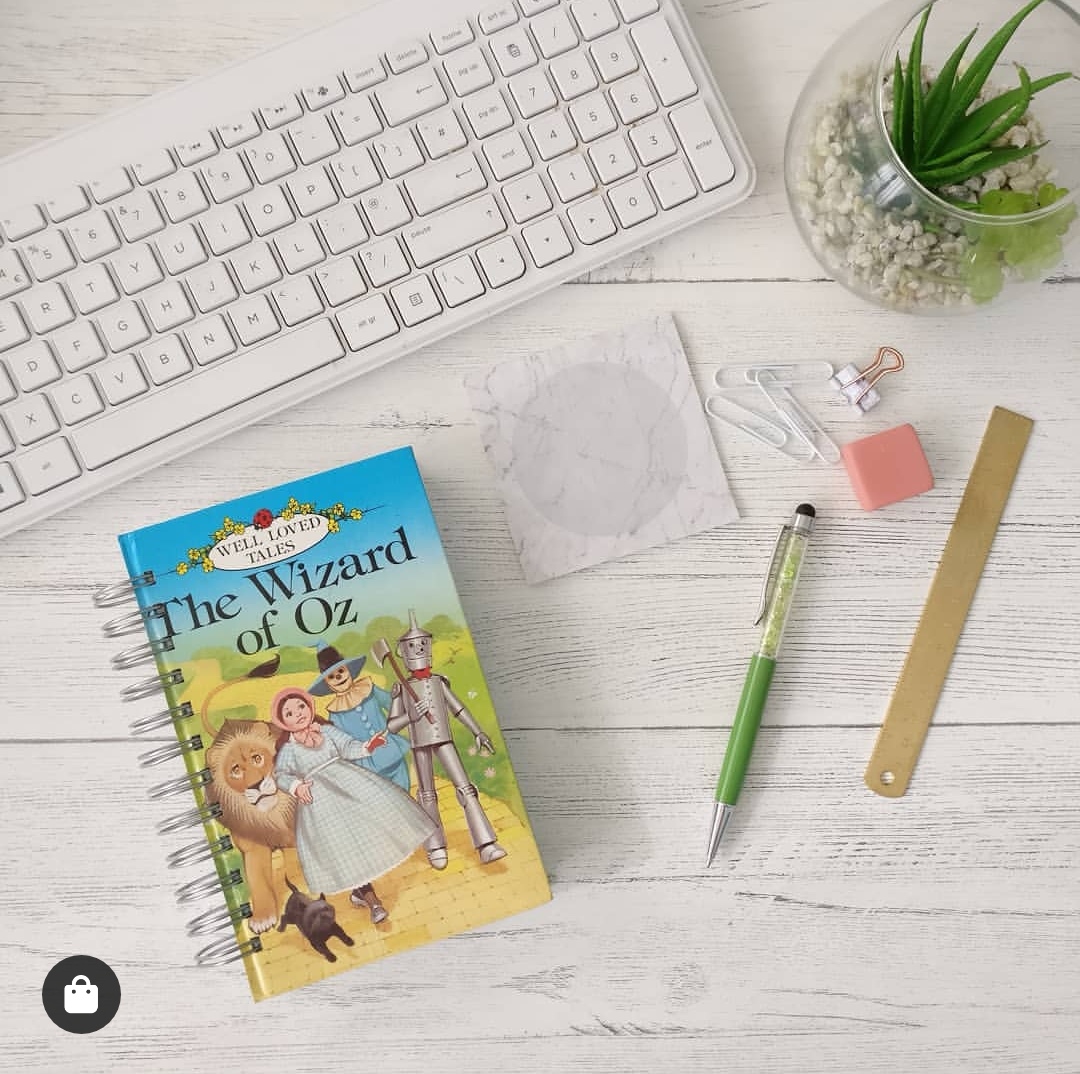
A notebook or diary is practical for any new job. And a unique notebook will make them stand out with colleagues – plus it is the perfect conversation starter and bound to brighten up those dull office meetings.
Make it personal
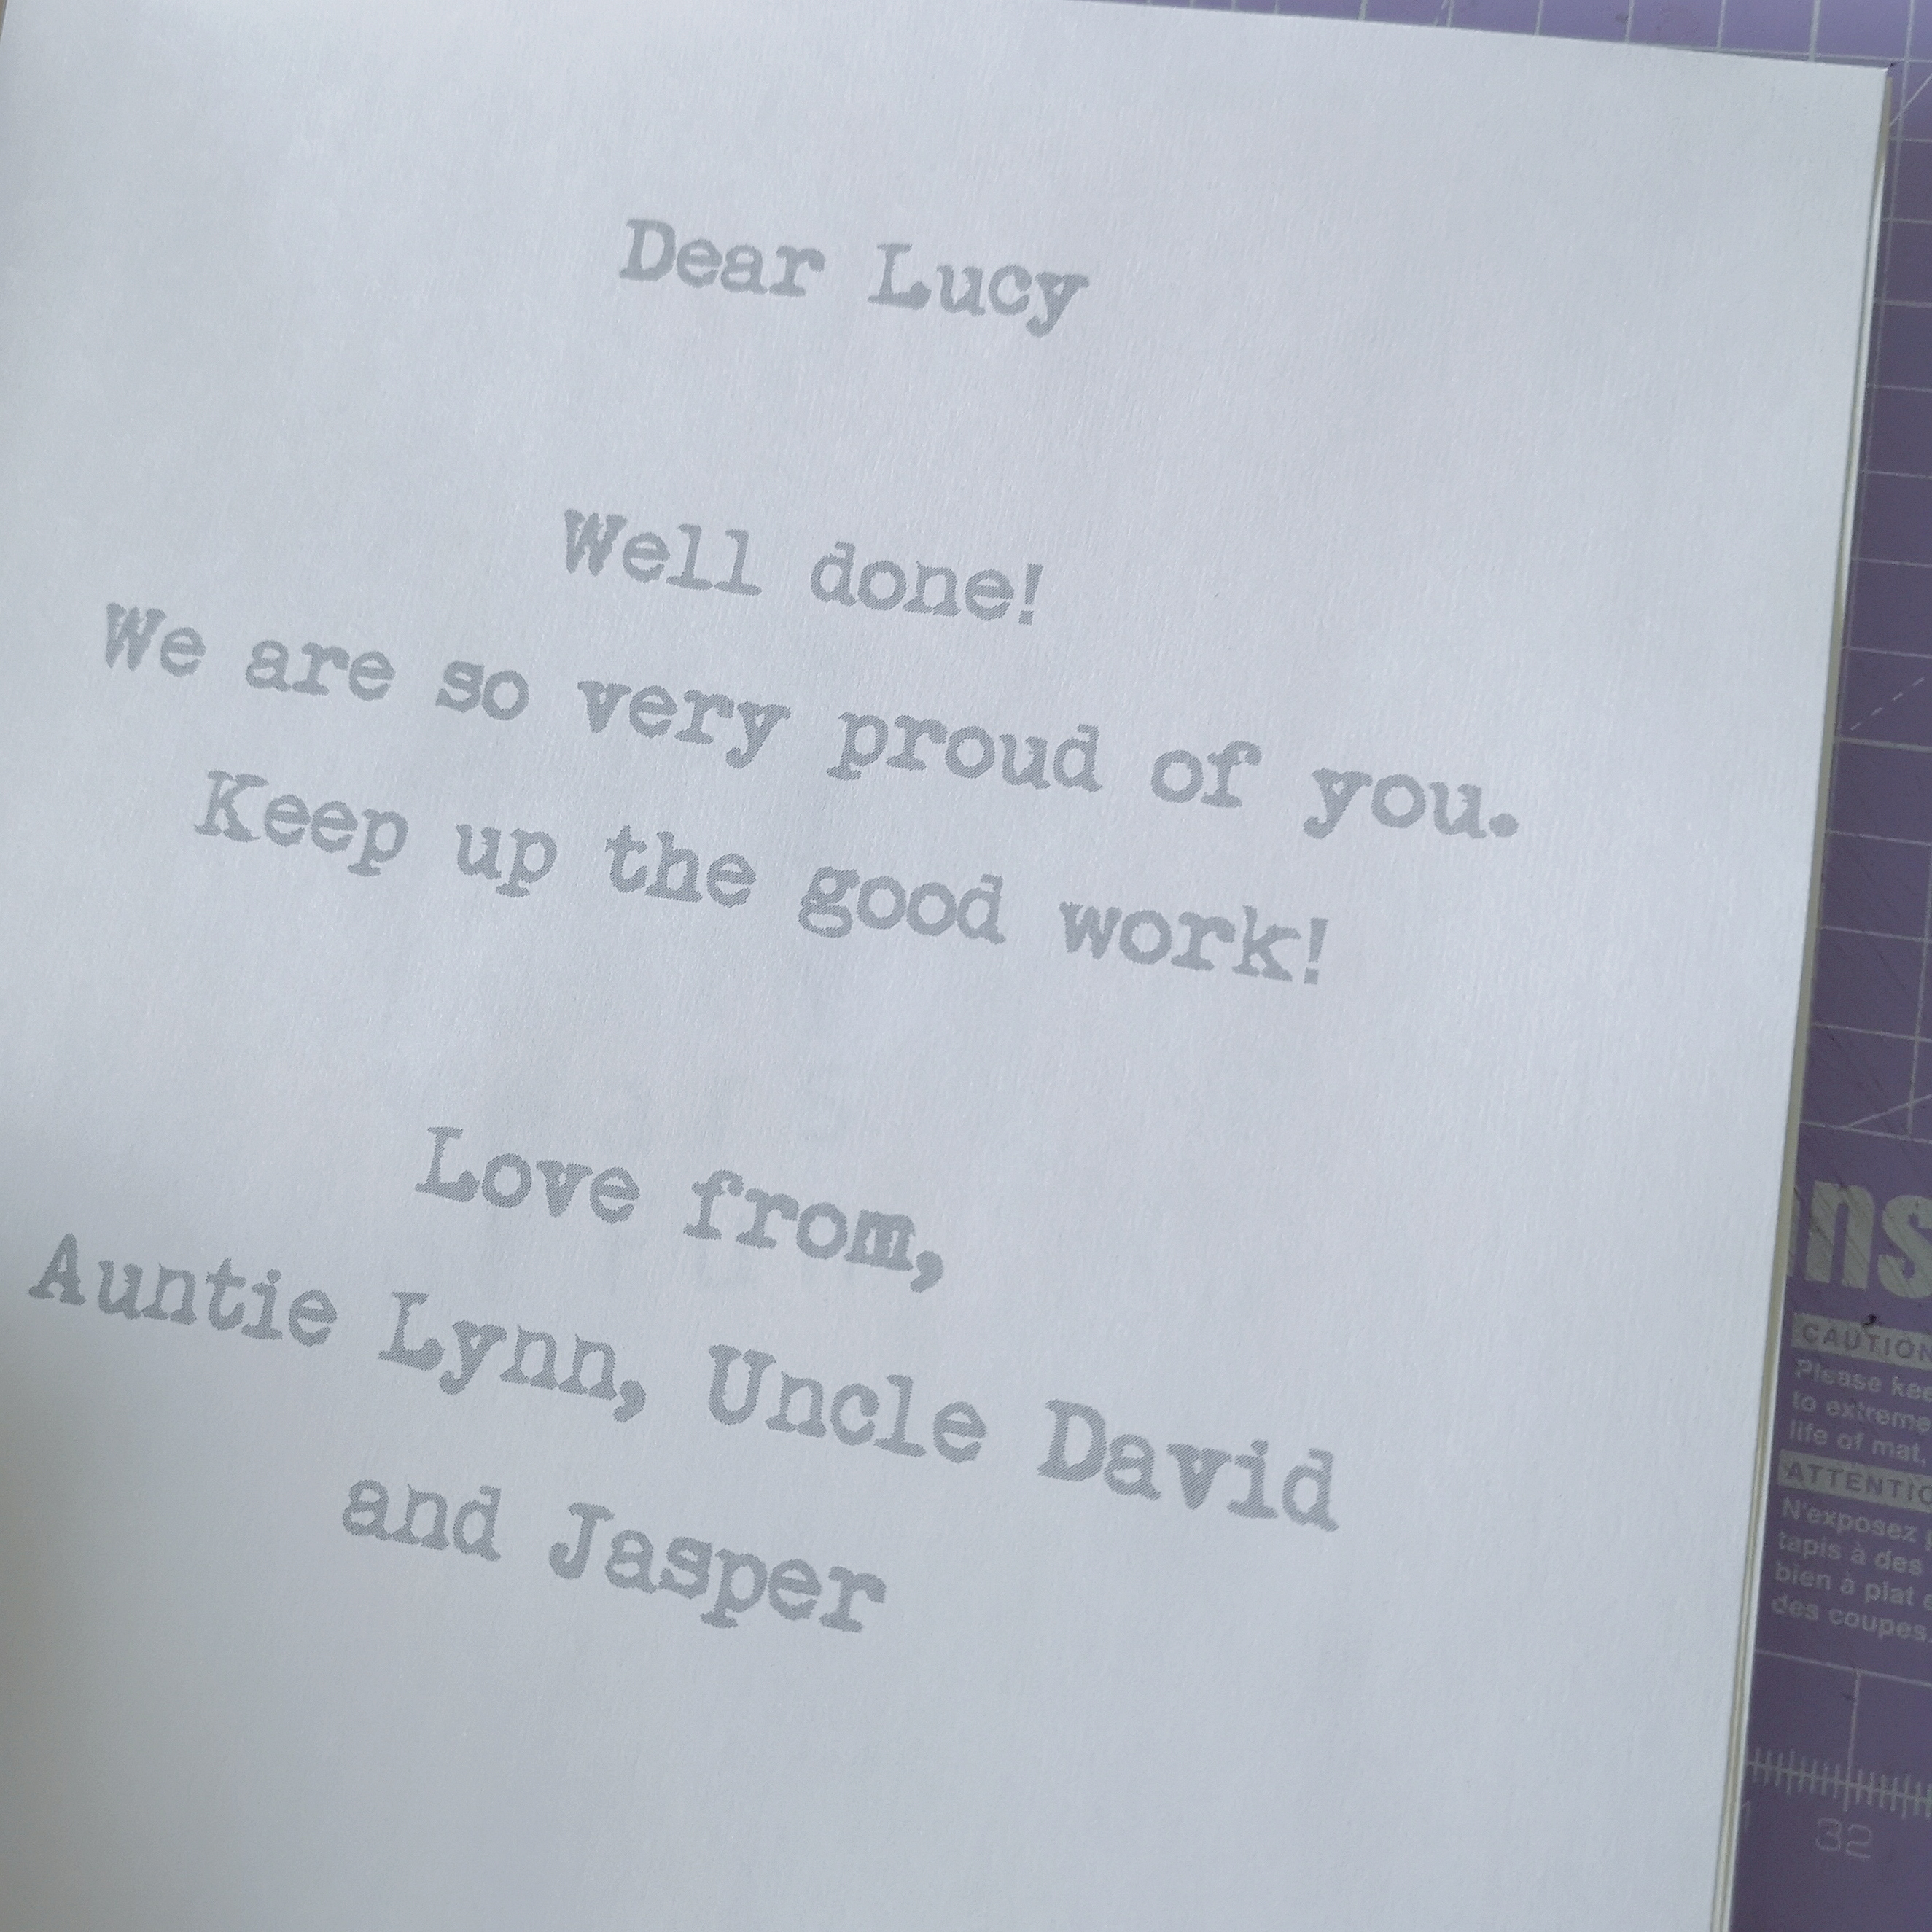
Don’t forget you can make your gift extra special by inserting a personalised message page – a constant reminder how proud you are of them.
Good luck to you all – and I hope you enjoy those celebrations!
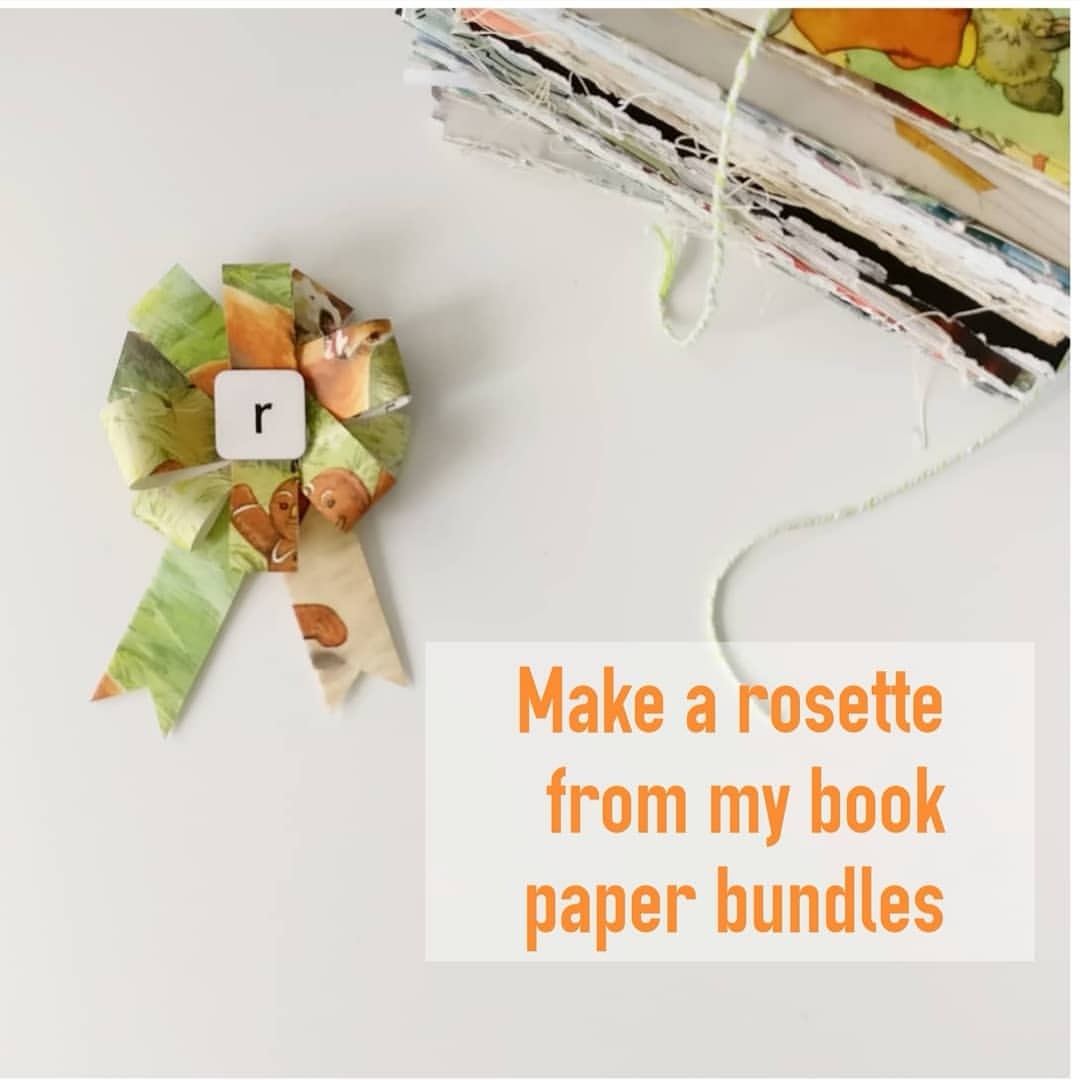
In this simple tutorial I will show you how to make a cute paper rosette. Once you know how, you will be able to make them in a range of materials and sizes for all sorts of occasions!
You can use any paper to make a rosette but if you’d like to use vintage paper, I sell bundles of 300 sheets at £5 each
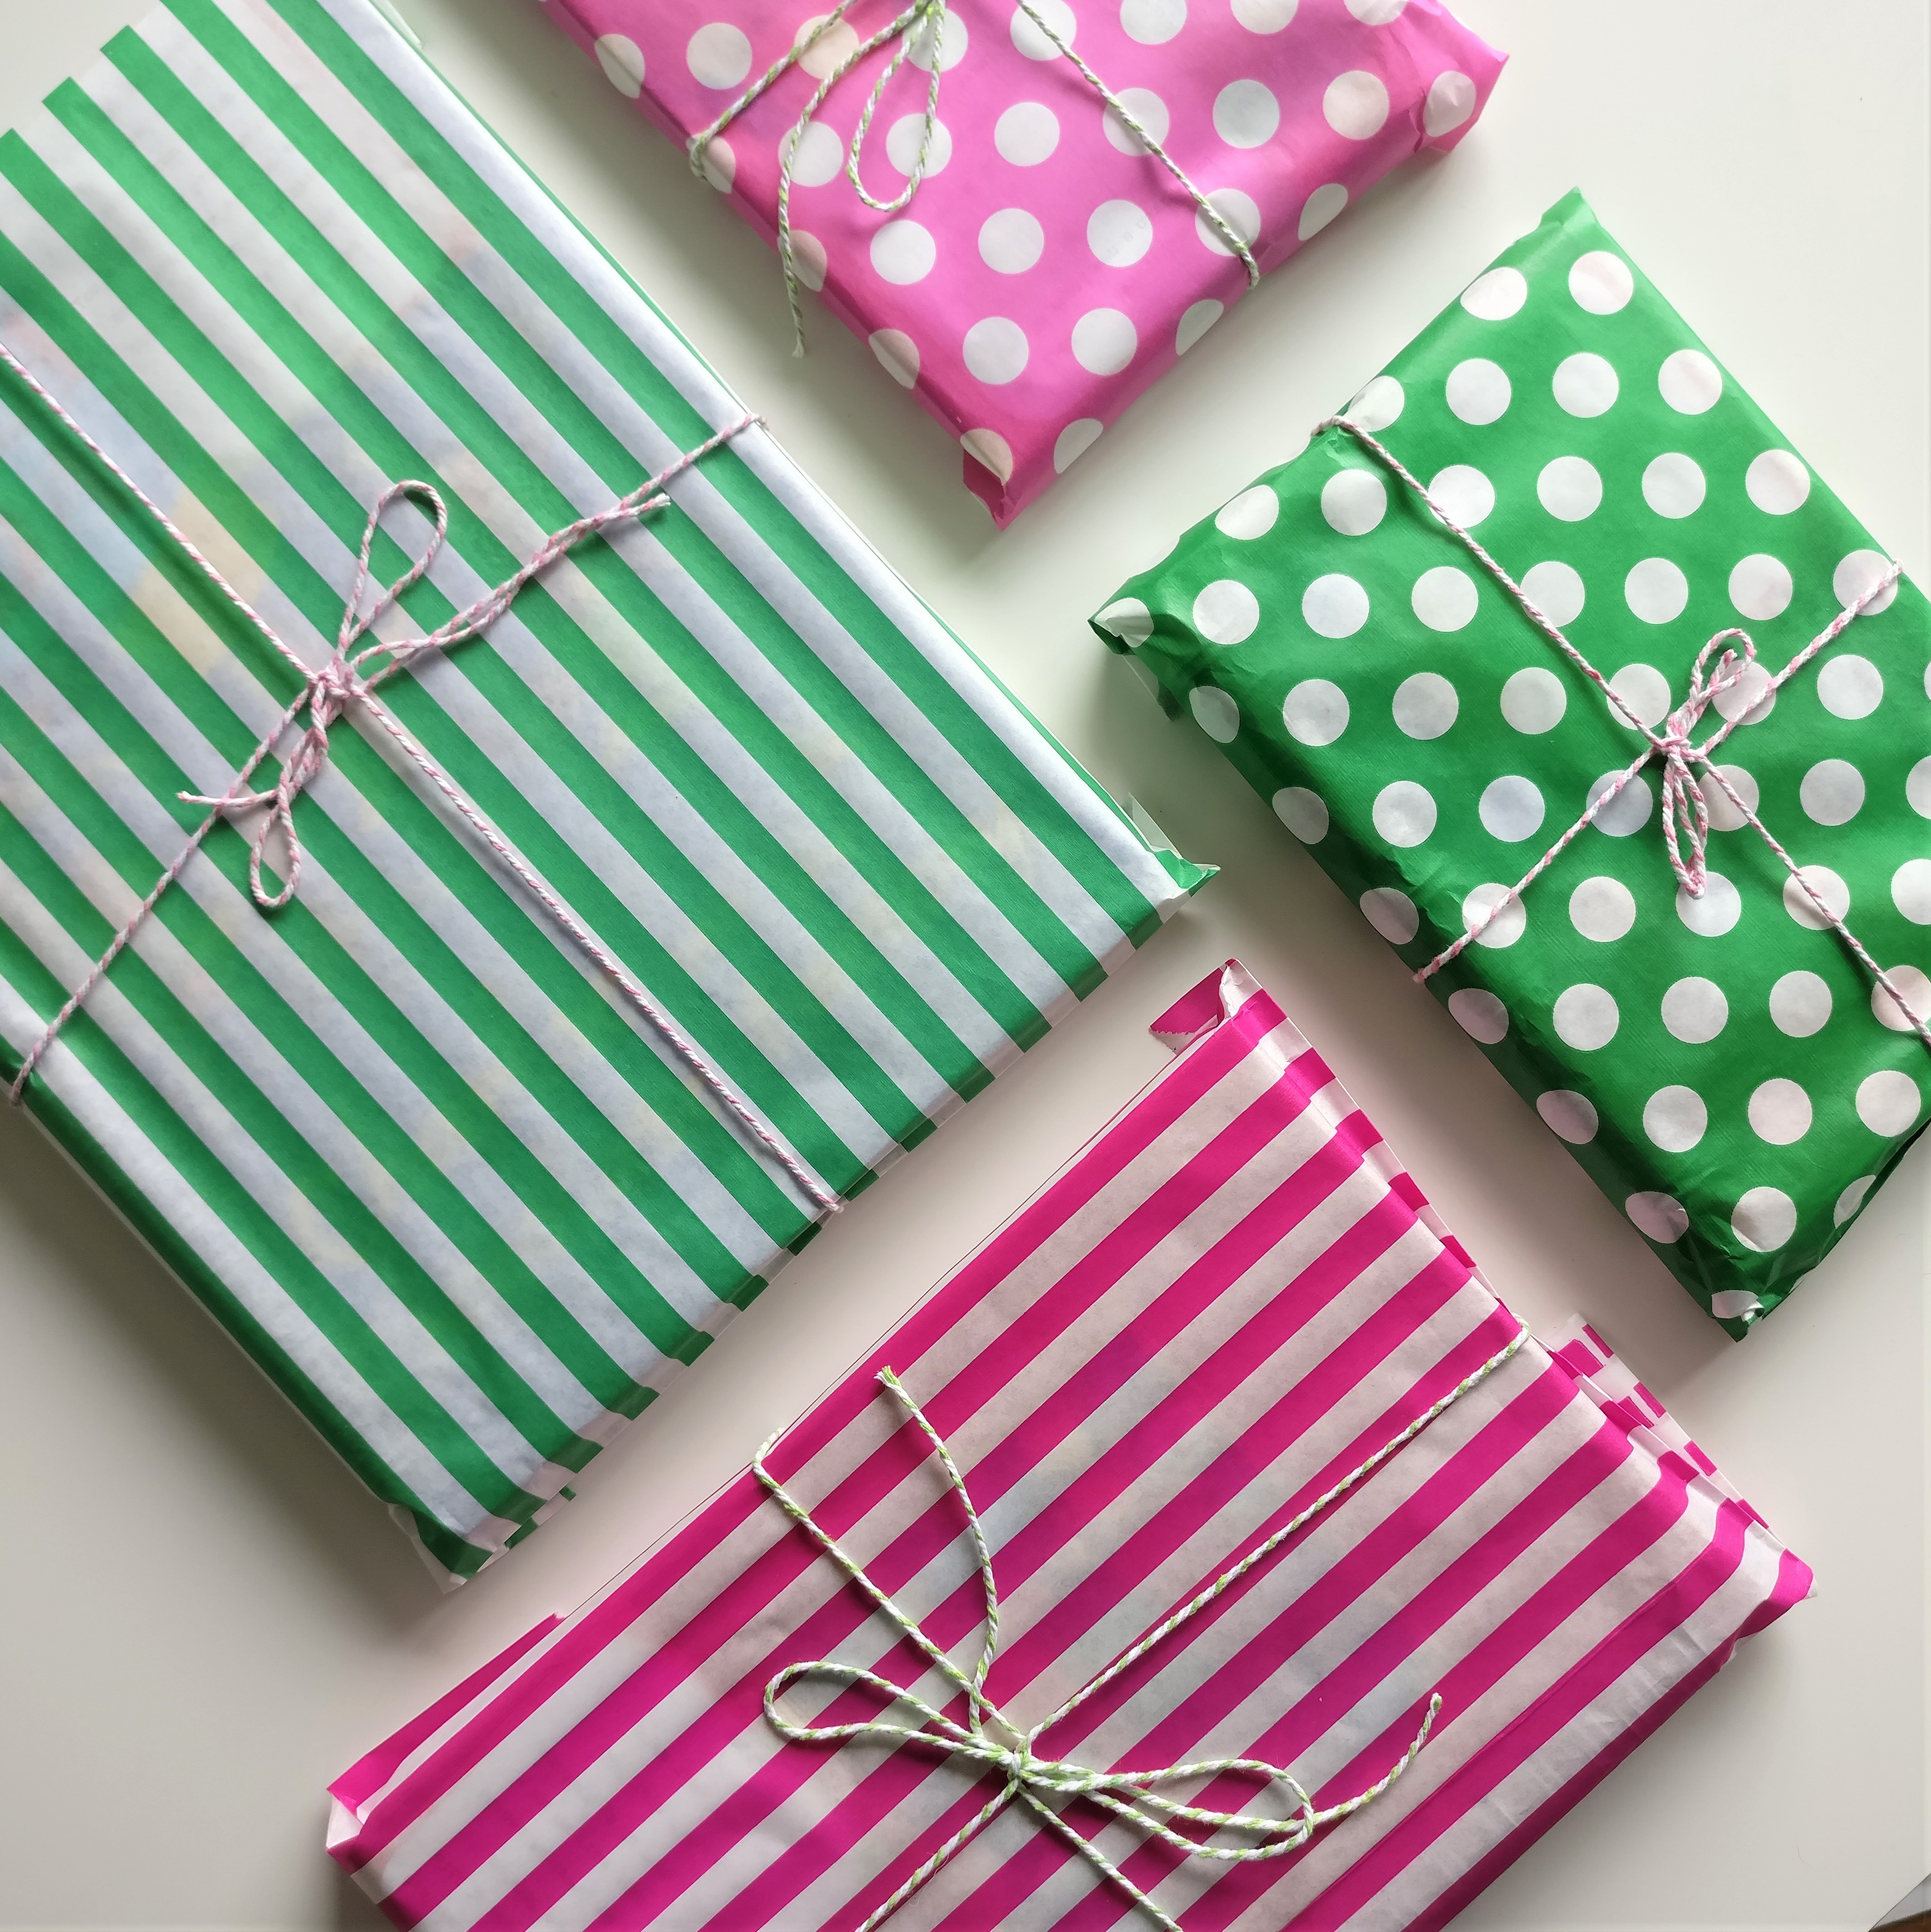
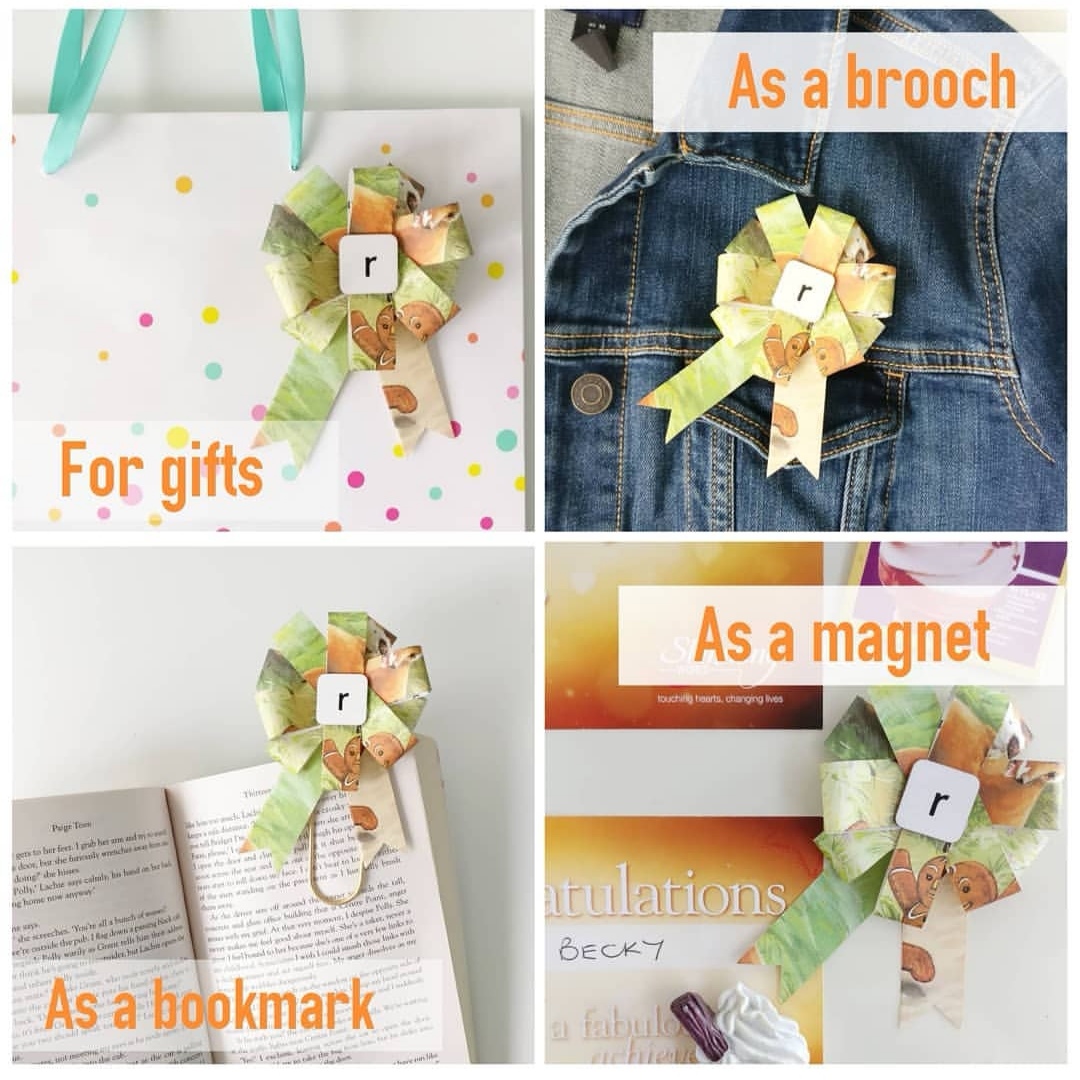
These cute rosettes can be used for a variety of things, I like to use in gift wrapping but here are some other ideas:
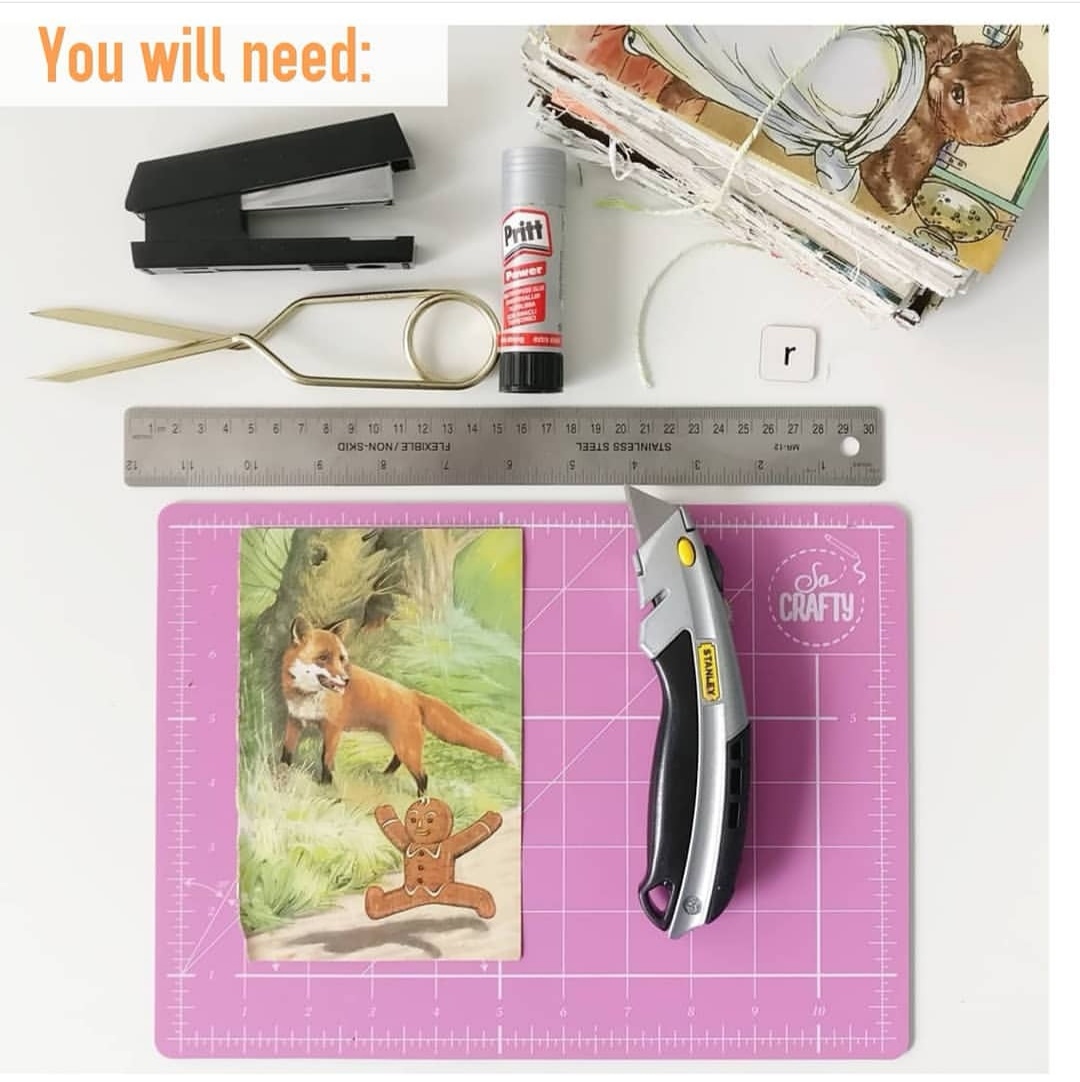
Get all your equipment together:
You will need paper, knife, ruler, cutting mat, glue, scissors and a stapler plus anything else you’d like to use as an attachment e.g. safety pin, magnet, hair clip etc…
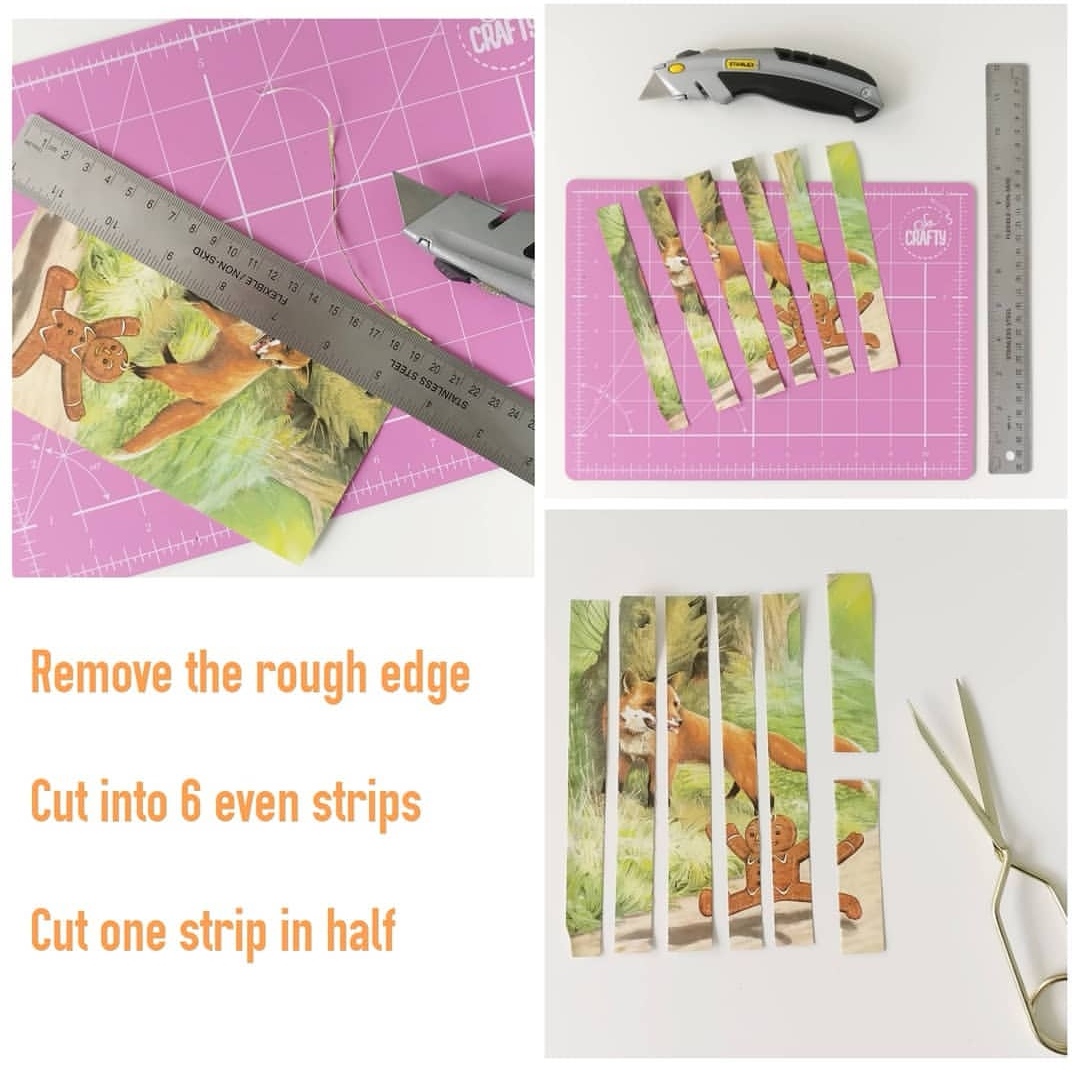
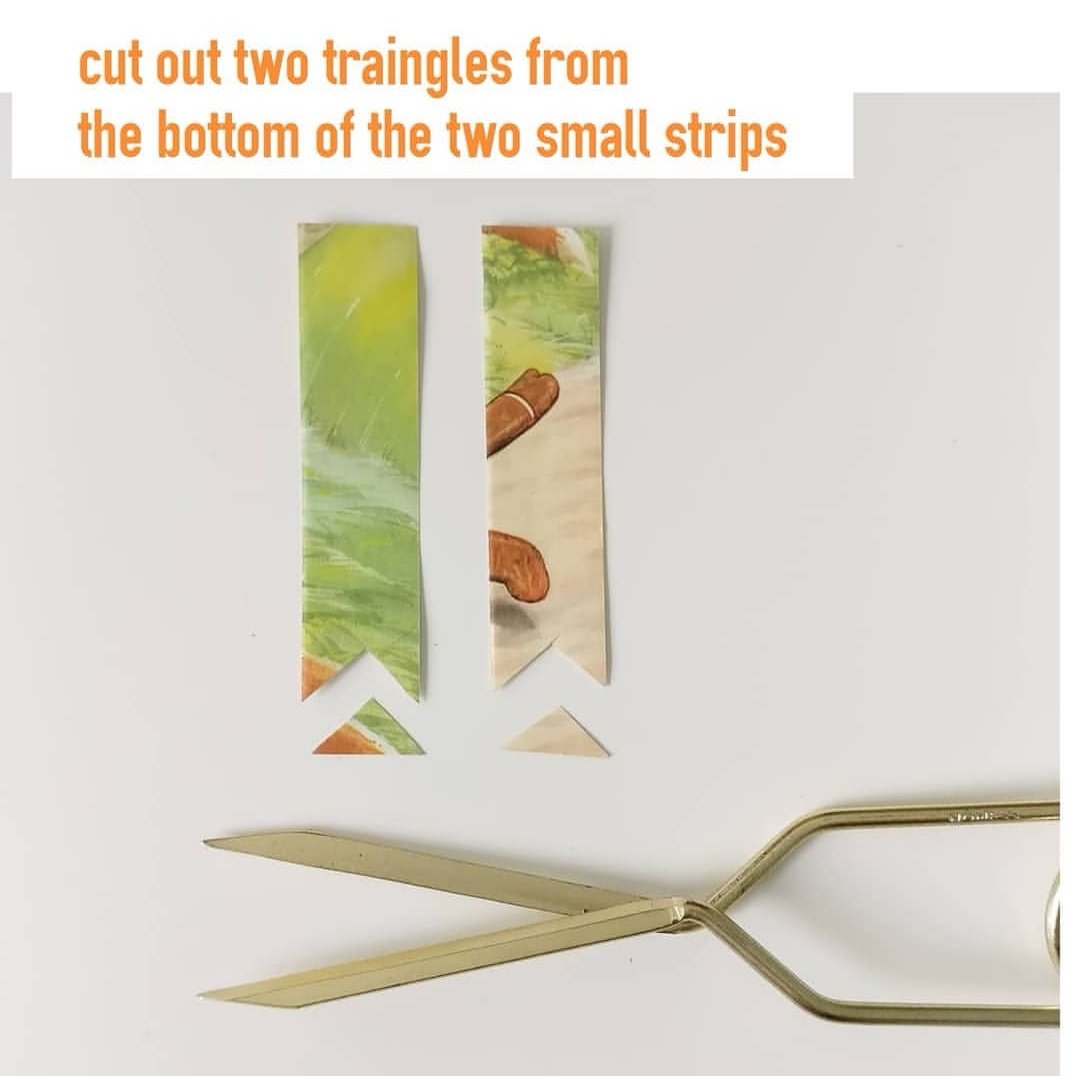
You should have 5 big strips and two small strips – these measure 1cm x 17cm and 1cm x 8.5cm
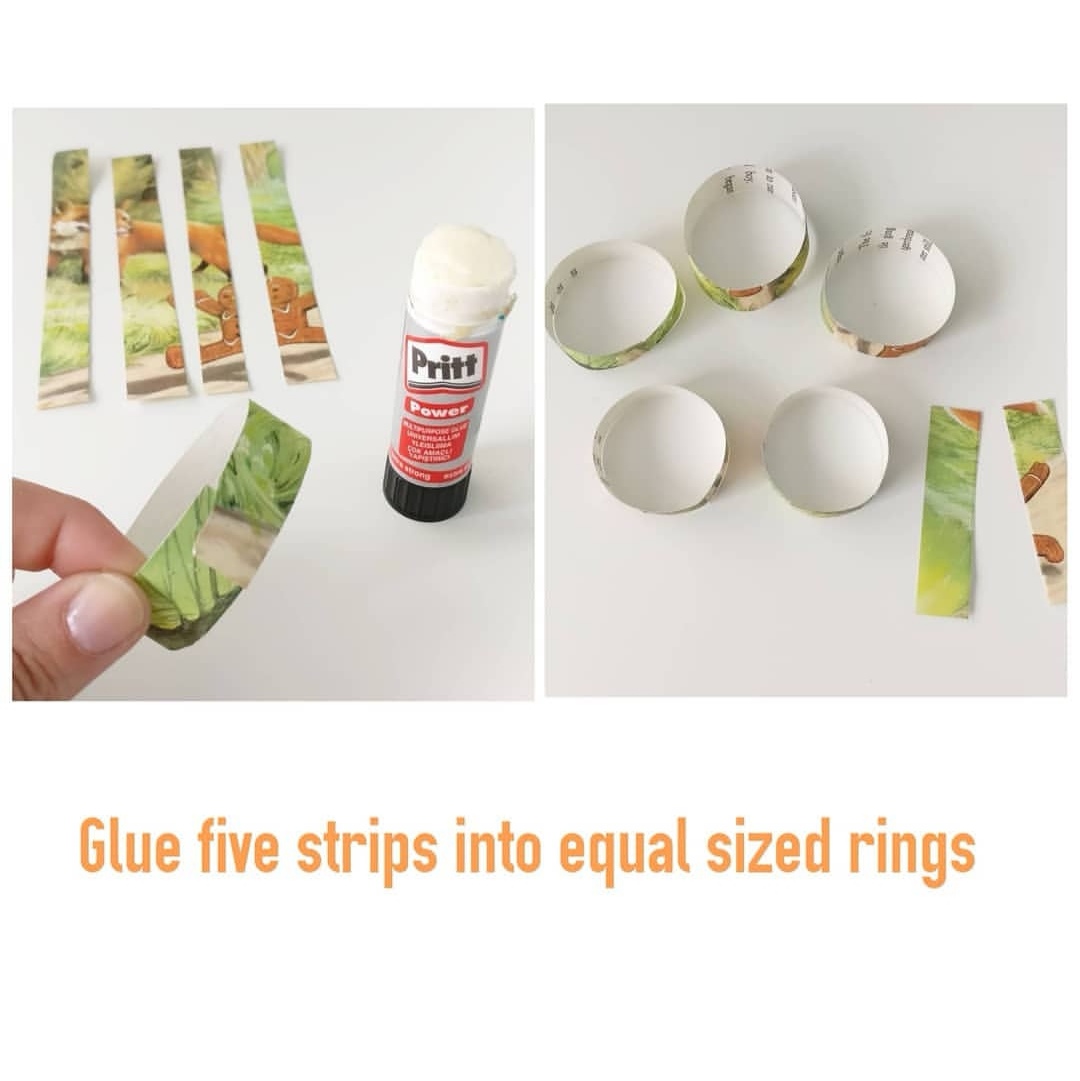
Glue the five long strips into rings with about a 5- 8mm overlap – try to keep them all the same size.
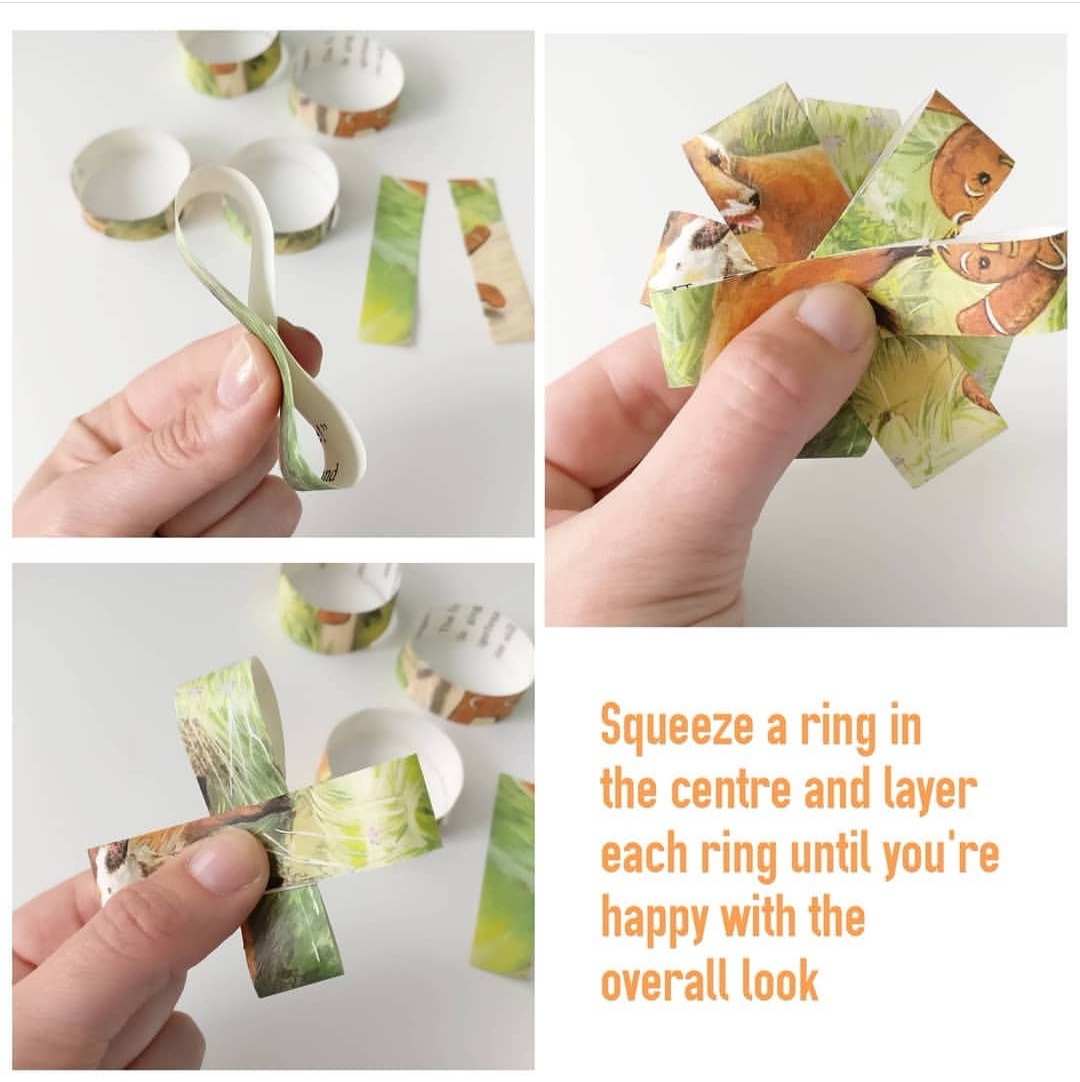
Now comes the fiddly bit. For your first time you may find it easier to pop a little bit of glue inside the circles to create the figure of 8 shapes and then layer them (with practice you won’t need to do this)
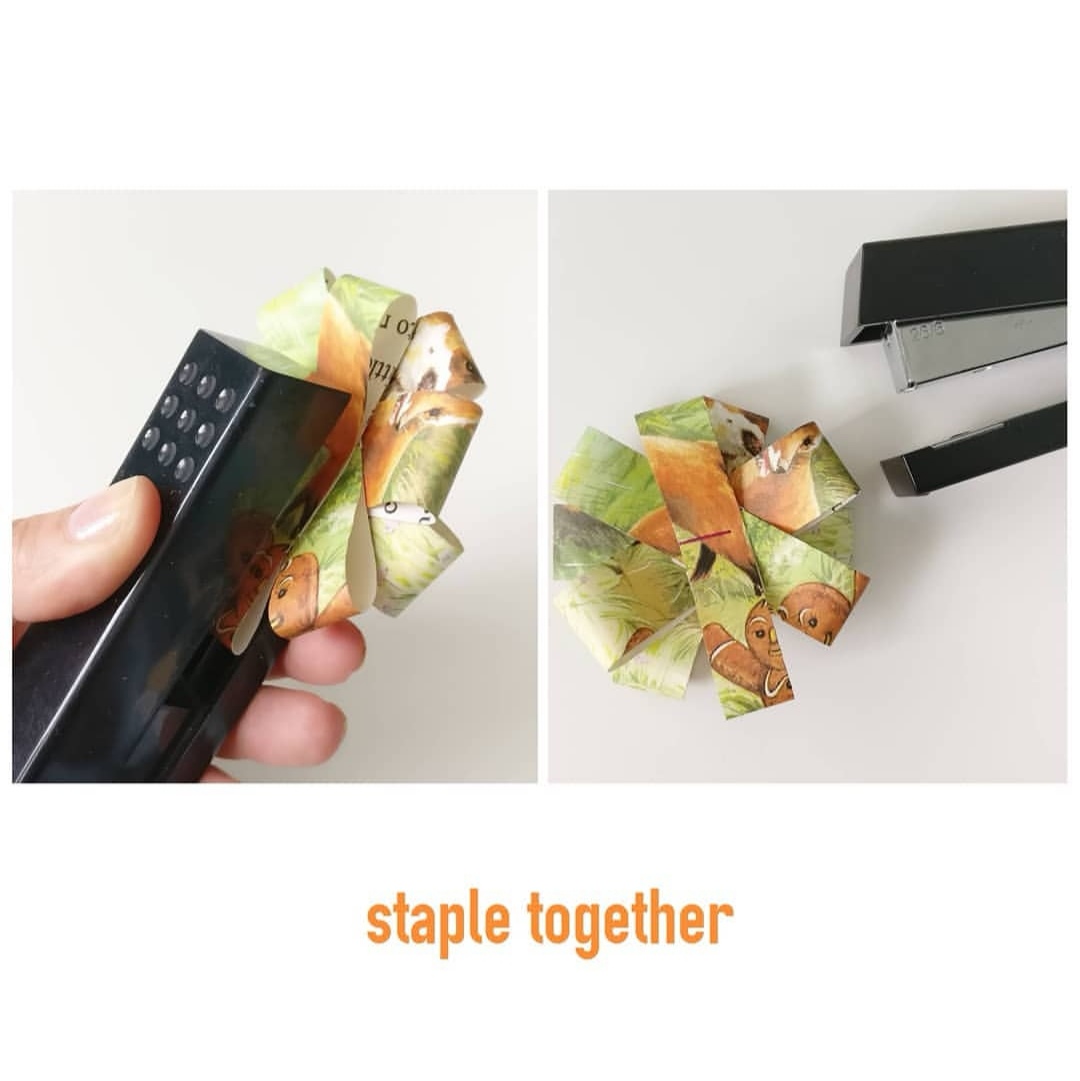
With all the 5 circles layered pop a staple through them to hold them in place – try and aim for the centre as best as possible. (We will be covering the staple up!)
Try and make the triangles as symmetrical as possible. If using ribbon I would suggest folding the ribbon in half and cutting a diagonal line from crease to corner to create the perfect notch, but you don’t want to do that when using paper as you’ll see the crease!
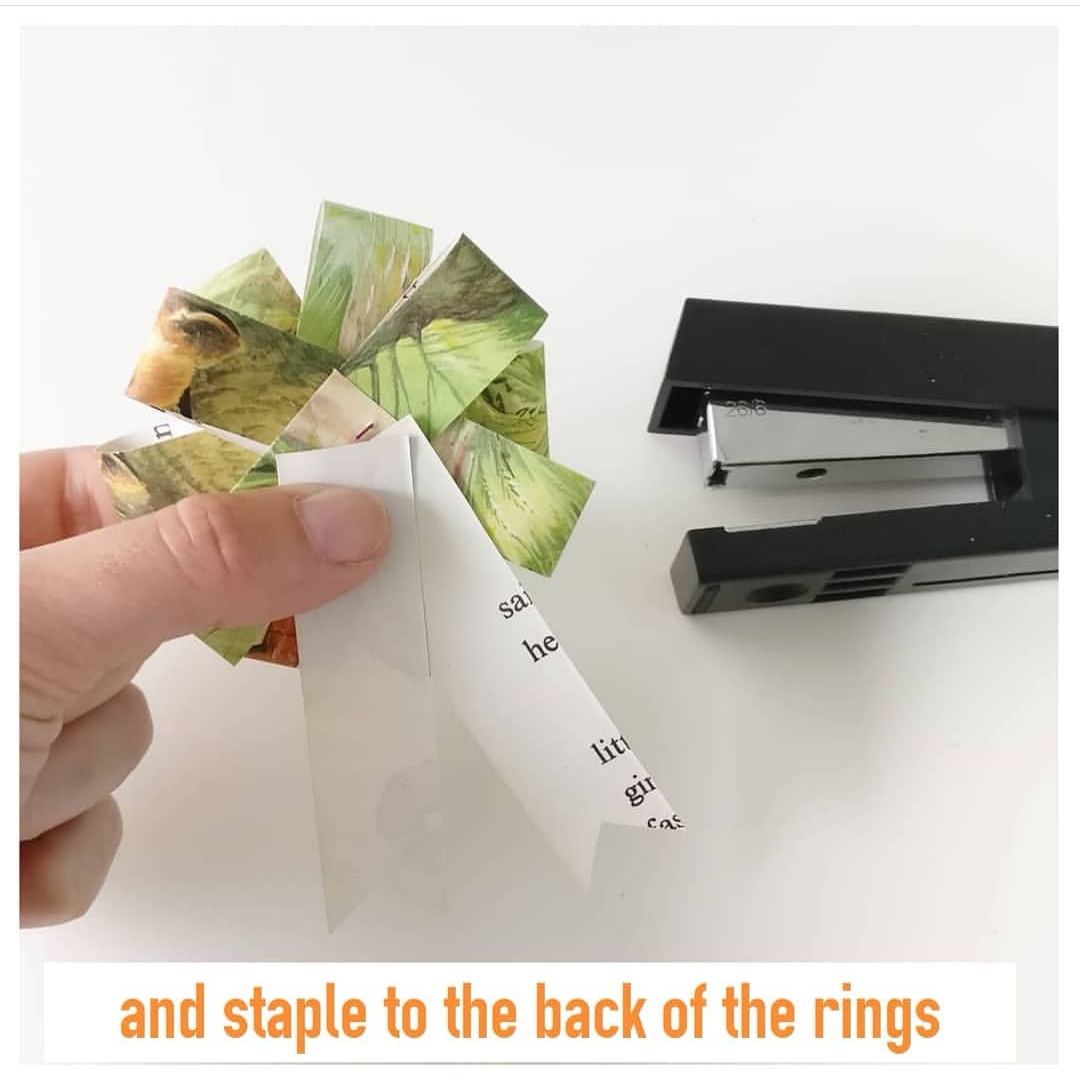
You could glue them but stapling makes them more secure.
Hide the staples with a button or something decorative like a scrabble letter like I’ve used here – a cute way of personalising a gift!
I hope you’ve enjoyed this tutorial – if you have a go at making one please share on your social media and tag me @retrofromscratch so I can see it!
Remember you don’t have to use vintage paper to make your rosette – why not recycle some old restaurant menus or unwanted flyers? An old magazine? Or even newspaper? You can make them from ribbon too, just remember to replace the stapler with glue – I recommend Bostick All Purpose Glue
If you have any questions please ask! Happy crafting!